No Comments

Enable WakeOnLan (WOL) on Strix Halo

{,,}
November 15th, 2025

First enter the bios and enable Wake-On-LAN there.

Is that all? You might expect everything is working now, by sending the magic WOL packet from another machine to the Strix Halo’s correct MAC address on your LAN.

How to find the MAC address of your Strix Halo:

Boot your Strix Halo machine , open a terminal and type

ip a

look for eth0 or enoX and the line, link/ether

00:1A:2B:3C:4D:5E (example only)

Be aware that Wake-On-LAN can only work on Ethernet, not Wi-Fi.

Power off your Strix Halo

On another machine or laptop run:

wakeonlan <Strix-Halo-MAC-address>
whatis wakeonlan
wakeonlan (1) - Perl script to wake up computers

If you need to install it:

sudo apt install wakeonlan

But, this did not work from my laptop.

wakeonlan <Strix-Halo-MAC-address>

After powering off and issuing this command from my laptop, nothing happened.

So I started Strix Halo manually by pressing the power button and started debugging.

sudo ethtool eno1 | grep Wake
Supports Wake-on: pumbg
Wake-on: d

What does this mean?

According to Qwen-Coder:

This indicates which wake-on-LAN features your NIC supports, using a code:
Letter Meaning
p Magic Packet – The standard WoL packet that can wake the machine
u Unicast – Wake from a unicast packet (specific to your MAC address)
m Multicast – Wake from multicast packets
b Broadcast – Wake from broadcast packets
g Gigabit – Wake-on-LAN over gigabit Ethernet (if applicable)

Wake-on: d means it is disabled software wise.

You have to enable it in the software as well, a bit surprising.

Enable WakeOnLan on your ethernet, also activate WOL in software

sudo ethtool -s eno1 wol g

After that.

sudo ethtool eno1 | grep Wake
Supports Wake-on: pumbg
Wake-on: g

So g means, it is enabled now.

I shutdown my Strix Halo, and now I could start it from my laptop:

wakeonlan <MAC-address>

But it stopped working after reboot, it only worked once.

Enable Wake-On-LAN on your ethernet interface, persistently

To make it persistent after reboot, you have to configure it with nmcli:

Lookup the connection name for ethernet (netplan-eno1)

sudo nmcli d

Then make it persistent:

sudo nmcli c modify "netplan-eno1" 802-3-ethernet.wake-on-lan magic

Links and resources:

  • https://wiki.debian.org/WakeOnLan
No Comments

Setting up unified memory for Strix Halo correctly on Ubuntu 25.04 or 25.10

{,,,}
November 12th, 2025

You have followed the online instructions, but upon running the Strix Halo Toolbox, you are still encountering memory errors on your 128GB Strix Halo system, and for example qwen-image-studio fails to run.

File "/opt/venv/lib64/python3.13/site-packages/torch/utils/_device.py", line 104, in torch_function
return func(*args, **kwargs)
torch.OutOfMemoryError: HIP out of memory. Tried to allocate 3.31 GiB. GPU 0 has a total capacity of 128.00 GiB of which 780.24 MiB is free. Of the allocated memory 57.70 GiB is allocated by PyTorch, and 75.82 MiB is reserved by PyTorch but unallocated. If reserved but unallocated memory is large try setting PYTORCH_HIP_ALLOC_CONF=expandable_segments:True to avoid fragmentation. 

(https://github.com/kyuz0/amd-strix-halo-image-video-toolboxes/issues)

You’ve verified your configuration using sudo dmesg | grep "amdgpu:.*memory", and the output indicates that the GTT size is correct.

It is likely that you configured the GTT size using the outdated and deprecated parameter amdgpu.gttsize, which may explain why the setting is not taking effect. Alternatively, you may have used an incorrect prefix—amdttm. instead of the correct ttm..

Please verify your configuration to ensure the proper syntax is used:

How to check the unified memory setting on AMD Strix Halo/Krackan Point:

cat /sys/module/ttm/parameters/p* | awk '{print $1 / (1024 * 1024 / 4)}'

The last two lines must be the same, and the number you see is amount of unified memory in GB.

How to setup unified memory correctly

In the BIOS, set the GMA (Graphics Memory Allocation) to the minimum value: 512MB. Then, add a kernel boot parameter to enable unified memory support.

Avoid outdated methods, they no longer work. Also, note that the approach differs slightly depending on your hardware: AMD Ryzen processors require a different configuration (ttm) compared to Instinct-class (professional workstation) GPUs (amdttm).

To max out unified memory:

Edit /etc/default/grub for and change the GRUB_CMDLINE_LINUX_DEFAULT line to:

128GB HALO

GRUB_CMDLINE_LINUX_DEFAULT="quiet splash amd_iommu=off ttm.pages_limit=33554432 ttm.page_pool_size=33554432"

96GB HALO

GRUB_CMDLINE_LINUX_DEFAULT="quiet splash amd_iommu=off ttm.pages_limit=25165824 ttm.page_pool_size=25165824"

64GB HALO

GRUB_CMDLINE_LINUX_DEFAULT="quiet splash amd_iommu=off ttm.pages_limit=16777216 ttm.page_pool_size=16777216"

32GB HALO

GRUB_CMDLINE_LINUX_DEFAULT="quiet splash amd_iommu=off ttm.pages_limit=8388608 ttm.page_pool_size=8388608"

The math here is 32GB: 32 x 1024 * 1024 * 1024 / 4096 -> 32 * 1024 * 256

The default page = 4096.

After you’ve edited the /etc/default/grub:

sudo update-grub2
reboot

You probably should leave some memory (~4GB) for your system to run smoothly, so edit above lines accordingly.

Check your config

To check if you’ve done it correctly, reboot and check:

cat /sys/module/ttm/parameters/p* | awk '{print $1 / (1024 * 1024 / 4)}'
96
96

Here the total memory of 96GB is set on a 96GB Strix Halo

If the last two numbers are not the same, try debugging the problem.

Debugging unified memory problem

Check dmesg for AMD VRAM and GTT size:

sudo dmesg | grep “amdgpu:.*memory”

[ 10.290438] amdgpu 0000:64:00.0: amdgpu: amdgpu: 512M of VRAM memory ready
[ 10.290440] amdgpu 0000:64:00.0: amdgpu: amdgpu: 131072M of GTT memory ready.

This seem correct, but setting set the GTT size with the old method amdgpu.gtt_size, will report the right size of GTT memory, but it can’t be used by ROCm unless  you set the TTM memory correctly You’ll notice an other warning in the dmesg output during early boot.

sudo dmesg | grep “amdgpu”

[ 17.652893] amdgpu 0000:c5:00.0: amdgpu: [drm] Configuring gttsize via module parameter is deprecated, please use ttm.pages_limit
[ 17.652895] amdgpu 0000:c5:00.0: amdgpu: [drm] GTT size has been set as 103079215104 but TTM size has been set as 48956567552, this is unusual

Furthermore you see a lot of sources mentioning to set amdttm.pages_limit or amdttm.page_pool_size. This won’t work with your Strix Halo but these settings are for AMD Instinct machines.

Confusing, yes, but just be careful to use the right settings in /etc/default/grub for  GRUB_CMDLINE_LINUX_DEFAULT

And don’t forget just check it with the mentioned oneliner:

cat /sys/module/ttm/parameters/p* | awk '{print $1 / (1024 * 1024 / 4)}'


Links and resources:

  • https://github.com/ROCm/ROCm/issues/5562#issuecomment-3452179504
  • https://strixhalo.wiki/
  • https://blog.linux-ng.de/2025/07/13/getting-information-about-amd-apus/
  • https://www.jeffgeerling.com/blog/2025/increasing-vram-allocation-on-amd-ai-apus-under-linux


Comments Off on How to use AMD ROCM on Krackan Point / Ryzen AI 300 series

How to use AMD ROCM on Krackan Point / Ryzen AI 300 series

September 30th, 2025

While AMD’s ROCm platform promises powerful GPU computing on Linux, users often encounter frustrating and contradictory statements on their consumer hardware.

Is ROCM officially supported on any AMD APU? No, according to the official support matrix.

https://rocm.docs.amd.com/en/latest/compatibility/compatibility-matrix.html

Only discrete GPU cards are mentioned here.

Yes, according to other AMD sources, it is supported in preview on the new Strix Halo and other (high-end) Ryzen APUs, e.g. Strix Point / Krackan Point.

https://rocm.docs.amd.com/projects/radeon-ryzen/en/latest/index.html

Here is llamacpp-rocm

https://github.com/lemonade-sdk/llamacpp-rocm

In the past, I’ve run ROCM on a 4800U to try out LLMs. While offloading code to a rather small GPU, the integrated Vega of the 4800U, doesn’t necessarily make the LLM run faster, it does run quieter and is didn’t stress out the CPU so much, so besides speed, there are other benefits to be gained.

For that I wanted to try running llama.cpp with ROCm on a AMD Krackan Point laptop APU, a Ryzen 7 350 with an integrated 860M, with the same RDN 3.5 architecture as a Strix Halo.

Spoof ROCm support using HSA_OVERRIDE_GFX_VERSION

So, just try that ROCm version and spoof the GPU ID

To spoof your GPU ID is dead simple, simply set this environment variable: .HSA_OVERRIDE_GFX_VERSION

The iGPU ID of a Strix Halo is GFX1151.

The iGPU ID of a Krackan Point is GFX1152.

So with this workaround the only thing you have to do is download a working example for Strix Halo, and instead of running:

llama-cli -m model.gguf

You run:

HSA_OVERRIDE_GFX_VERSION="11.5.1"  llama-cli -m model.gguf

That’s all. Now you have ROCM running on a Strix Krackan laptop.

Running llama.cpp with ROCM (Ubuntu) on a Ryzen AI 7 350

The easiest way to run llama.cpp with ROCm support is to download a fresh builds of llama.cpp with AMD ROCm acceleration made by AMD:

Download the latest release:

wget https://github.com/lemonade-sdk/llamacpp-rocm/releases/download/b1066/llama-b1066-ubuntu-rocm-gfx1151-x64.zip
cd Downloads

Unzip the downloaded file

unzip llama-b1066-ubuntu-rocm-gfx1151-x64.zip -d llama-b1066-ubuntu-rocm-gfx1151-x64

Enter the dir

cd llama-b1066-ubuntu-rocm-gfx1151-x64

Mark llama-bench executable

chmod u+x llama-bench

Download a GGUf model

wget https://huggingface.co/unsloth/Qwen3-0.6B-GGUF/resolve/main/Qwen3-0.6B-Q5_K_M.gguf?download=true
llama-bench -m ~/Downloads/Qwen3-0.6B-Q5_K_M.gguf

It won’t run:

ggml_cuda_init: GGML_CUDA_FORCE_MMQ: no
ggml_cuda_init: GGML_CUDA_FORCE_CUBLAS: no
ggml_cuda_init: found 1 ROCm devices:
Device 0: AMD Radeon Graphics, gfx1152 (0x1152), VMM: no, Wave Size: 32
| model | size | params | backend | ngl | test | t/s |
| ------------------------------ | ---------: | ---------: | ---------- | --: | --------------: | -------------------: |
rocBLAS error: Cannot read ./rocblas/library/TensileLibrary.dat: Illegal seek for GPU arch : gfx1152
List of available TensileLibrary Files : 
"./rocblas/library/TensileLibrary_lazy_gfx1151.dat"
Aborted

Aha we forgot to override the GPU ID:

HSA_OVERRIDE_GFX_VERSION="11.5.1"  llama-cli -m model.guff

And now we’re running:

HSA_OVERRIDE_GFX_VERSION="11.5.1" ./llama-bench -m ~/Downloads/Qwen3-0.6B-Q5_K_M.gguf
ggml_cuda_init: GGML_CUDA_FORCE_MMQ: no
ggml_cuda_init: GGML_CUDA_FORCE_CUBLAS: no
ggml_cuda_init: found 1 ROCm devices:
Device 0: AMD Radeon Graphics, gfx1151 (0x1151), VMM: no, Wave Size: 32
| model | size | params | backend | ngl | test | t/s |
| ------------------------------ | ---------: | ---------: | ---------- | --: | --------------: | -------------------: |
| qwen3 0.6B Q5_K - Medium | 418.15 MiB | 596.05 M | ROCm | 99 | pp512 | 863.83 ± 86.23 |
| qwen3 0.6B Q5_K - Medium | 418.15 MiB | 596.05 M | ROCm | 99 | tg128 | 43.32 ± 1.89 |
build: 703f9e3 (1)

For Ubuntu, you have to do one more step to allow a toolboc container to use you’re GPU for ROCM. For that you have to create udev rule:

https://github.com/kyuz0/amd-strix-halo-toolboxes?tab=readme-ov-file#211-ubuntu-users

cat /etc/udev/rules.d/99-amd-kfd.rule:

SUBSYSTEM=="kfd", GROUP="render", MODE="0666", OPTIONS+="last_rule"
SUBSYSTEM=="drm", KERNEL=="card[0-9]*", GROUP="render", MODE="0666", OPTIONS+="last_rule"

Is it worth running ROCm on Strix Point, Krackan Point

Not really. It isn’t faster. Vulkan is doing a better job at the moment.

Llama.cpp ROCM vs Vulkan Benchmarks vs CPU on Ryzen AI 7 350

| model | size | params | backend | ngl | test | t/s |
| ------------------------------ | ---------: | ---------: | ---------- | --: | --------------: | -------------------: |
| qwen3 0.6B Q5_K - Medium | 418.15 MiB | 596.05 M | ROCm | 99 | pp512 | 863.83 ± 86.23 |
| qwen3 0.6B Q5_K - Medium | 418.15 MiB | 596.05 M | ROCm | 99 | tg128 | 43.32 ± 1.89 |
| qwen3 0.6B Q5_K - Medium | 418.15 MiB | 596.05 M | RPC,Vulkan | 99 | pp512 | 1599.95 ± 14.06 |
| qwen3 0.6B Q5_K - Medium | 418.15 MiB | 596.05 M | RPC,Vulkan | 99 | tg128 | 80.84 ± 2.81 |
| qwen3 0.6B Q5_K - Medium | 418.15 MiB | 596.05 M | RPC | 99 | pp512 | 406.69 ± 0.21 |
| qwen3 0.6B Q5_K - Medium | 418.15 MiB | 596.05 M | RPC | 99 | tg128 | 108.54 ± 1.82 |

Running the small Qwen3 model on CPU is surprisingly the fastest in token generation, but prompt processing is much faster on Vulkan/GPU.

Sources:
https://github.com/kyuz0/amd-strix-halo-toolboxes
https://llm-tracker.info/_TOORG/Strix-Halo
https://github.com/lemonade-sdk/llamacpp-rocm/

Comments Off on How to update/upgrade your Apple Mac Mini M4 over ssh

How to update/upgrade your Apple Mac Mini M4 over ssh

September 22nd, 2025

The Mac Mini M4 in its basic configuration is a very affordable and efficient device for a small local server. Its 16GB is a significant improvement over the former 8GB of the M3, and a single core of the M4 Mini is as fast as any other Mac’s single core. It just has fewer cores than other models

Power-efficiency is really great, it sips around 3-4 W when idle which is comparable to a Raspberry Pi.

Using the Mini M4 as a server normally means you have only a network cable attached, but no screen, keyboard, or mouse.

To update your Mac Mini M4 server via SSH

To get a list of available updates:

softwareupdate -l

To update all the software:

sudo softwareupdate -i -a

If you attempt to upgrade your OS to a new version this way, for example Tahoe, you’ll get this output

sudo softwareupdate -i -a
Software Update Tool


Finding available software
Downloading macOS Tahoe 26
Password:


Downloaded: macOS Tahoe 26

It doesn’t install the available upgrade.

To actually upgrade, you need to pass -R, this causes your M4 to restart and  upgrade on boot.

sudo softwareupdate -i -r -R

Now, the M4 will restart and upgrade. This will take a couple of minutes.

How to check if a Mac Mini M4 is running macOS 26 Tahoe

To check if the Mac Mini M4 is upgraded to macOS 26 Tahoe, run uname -a and verify the output:

Darwin mini.local 25.0.0 Darwin Kernel Version 25.0.0: Mon Aug 25 21:12:01 PDT 2025; root:xnu-12377.1.9~3/RELEASE_ARM64_T8132 arm64

Comments Off on The SHIFTphone 8.1 has 18 replaceable modules, 13 DIY

The SHIFTphone 8.1 has 18 replaceable modules, 13 DIY

September 21st, 2025

Most people are familiar with the Dutch Fairphone as a initiative in sustainable smartphone design. The SHIFTphone 8 represents a comparable commitment to longevity and sustainability, designed in Germany—though, like the Fairphone, it is manufactured in China.

While both the SHIFTphone 8 and the Fairphone 5 feature the same QCM6490 octa-core processor (based on the Snapdragon 778G, but with extended software support) and offer a decade of software support, the SHIFTphone 8 provides several enhanced specifications:

  • 12GB internal memory LPDDR
  • 256 or 512GB internal storage UFS 3.1
  • IP66 dust and weather resistance
  • Wireless charging capability (Qi-Standard)
  • 120 Hz refresh rate display
  • Fast charging: Power Delivery 3.0, Quick Charge 4
  • Custom key (left / configurable)
  • Hardware kill-switches for cameras and microphone

In addition, the SHIFTphone 8.1 offers a significant improvement in modularity, with 18 replaceable components—compared to the Fairphone 5’s nine—further reinforcing its focus on repairability, sustainability, and extended device lifecycle.

SHIFTphone 8.1 replaceable modules

SHIFTphone 8.1 replaceable modules

The 18 replaceable modules of the SHIFTphone 8.1

A small screwdriver is included.

  1. Amoled Display (1080 x 2400 Pixel) 6,67″, 120 Hz Gorilla Glas
  2. Camera Module 1 (main ) 50Mpx, Sony IMX 766
  3. Camera Module 2 (wideangle) 50MPpx, Sony IMX 766
  4. Camera Module 3 (front/selfie), Sony IMX616 32 MPx, pixel binning 8Mpx
  5. Battery ( 3820 mAh)
  6. eSIM
  7. Fingerprint sensor (front under the display)
  8. Proximity sensor  & Light sensor
  9. Vibration motor
  10. USB-C port (USB 3.2 (Gen1, 5Gb/s) type-C)
  11. Sub-board
  12. Ear speaker
  13. Main speaker
  14. Mainboard
  15. SIM card slots (2x nano, or 1 nano and 1 eSIM nano)  & SD card slot (Micro-SDXC up to 2TB)
  16. Antenna module
  17. Keyboard unit (Volume and power keys)
  18. Custom key (left key)

The first 8 components can be replaced with relative ease, you should be able to do that at home (DIY).

A bit more difficult to replace are the modules  9-13, still you should be able to do that yourself if you have some experience and some basic mechanical knowledge.

The final five modules are more intricate and require specialized expertise. You’re advised to attend to SHIFT’s own workshop or another certified, specialized service provider .

You can find the video-guides here: https://www.shift.eco/shiftphone-8-guide/tutorials/

Comments Off on How to insert a timestamp in Gnote by keyboard

How to insert a timestamp in Gnote by keyboard

September 9th, 2025

Gnote is a very handy note taking app you can use on a Linux Desktop.

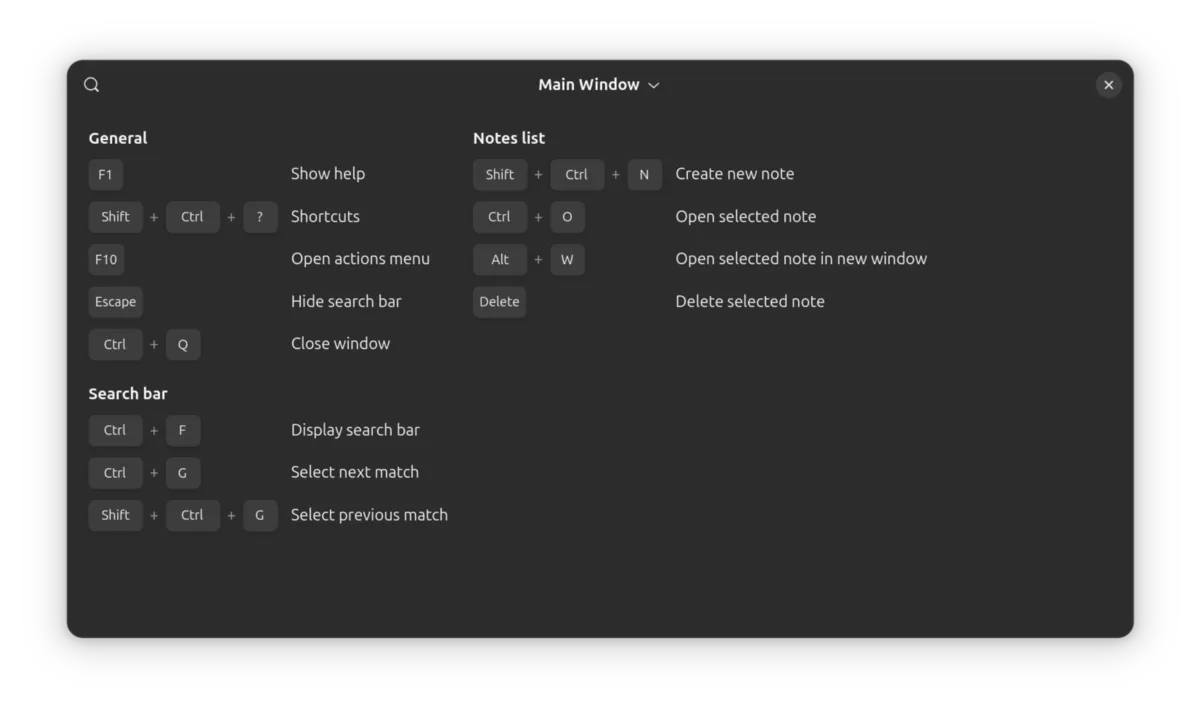
It has some nice keyboard shortcuts, but unfortunately Gnome is moving out from showing the shortcuts by default on every menu item, which to me was the only way to learn them.

Because when you open the menu everytime by mouse, you see immediately how you can do it faster by keyboard.

Not showing the shortcuts by default is designed for touchscreens or for mobile devices, but the default overview of shortcuts does have a big omission.

Plugin shortcuts are not displayed!

So how do you know you have to type CTRL + D to get the date.

I’m using Linux long enough to know that there was a shortcut for inserting the date/timestamp. BTW you need to enable the plugin for inserting the timestamp, but I forgot which shortcut to use.

I tried to look it up, but it’s not in the shortcut overview. How nice and handy.

Luckily I found this bug report, which explains that the shortcut is CTRL + D. (Which also more often is a shortcut for DELETE in other programs, so be careful)

Let’s wrap it up.

The shortcut for inserting the timestamp/date in Gnote is CTRL + D. Don’t forget to enable the plugin before in Preferences -> Plugins -> Insert Timestamp, and probably set your default format in the preferences of the plugin.

I always think that the date should be sortable by default so 2025-09-09 11:56 is the correct format.