Archive for the ‘raspberrypi’ Category

No Comments

Making screencasts on the Raspberry Pi 5 and Raspberry Pi OS Bookworm

Tuesday, November 14th, 2023

Recording your desktop, or recording a part of your desktop, or piping your desktop to Zoom, or in general as a webcam input, it can all be done quite easily with the new Raspberry Pi 5.

The new version of Debian is using Wayland as a default, so it’s always a bit of a search how to do rather trivial things on a new device and a new environment.

Anyhow there is a versatile simple Wayland desktop recording program, wf-recorder, that can be installed with:

sudo apt install wf-recorder

You can find more info here:

https://github.com/ammen99/wf-recorder

Recording is a simple as running wf-recorder 🙂

That outputs a file recording.mp4 in the directory it’s run from, so to get it organized a bit it needs some cli parameters.

Furthermore the programs starts recording until you kill it, normally by CTRL C on the cli.

Let’s setup a keyboard shortcut that records the desktop and save it in the Video’s folder with a filename screencast-2023-11-14_12-20.mkv, so it’s includes date and time.

And because the Raspberry Pi 5 can drive two monitors you have to specify which screen the screencast should be made of.

So to add shortcuts to the Wayland environment, just open .config/wayfire.ini and add them there:

binding_screencast_hdmi_a_1 = <super> <ctrl> KEY_1
command_screencast_hdmi_a_1 = timeout 30s wf-recorder -p crf=28 -t -o HDMI-A-1 -f "/home/pi/Videos/screencast-$(date +%Y-%m-%d_%H-%M).mkv"
binding_screencast_hdmi_a_2 = <super> <ctrl> KEY_2
command_screencast_hdmi_a_2 = timeout 30s wf-recorder -p crf=28 -t -o HDMI-A-2 -f "/home/pi/Videos/screencast-$(date +%Y-%m-%d_%H-%M).mkv"
binding_screencast_hdmi_a_1_audio = <super> <alt> KEY_1
command_screencast_hdmi_a_1_audio = timeout 30s wf-recorder -a -p crf=28 -t -o HDMI-A-1 -f "/home/pi/Videos/screencast-$(date +%Y-%m-%d_%H-%M).mkv"
binding_screencast_hdmi_a_2_audio = <super> <alt> KEY_2
command_screencast_hdmi_a_2_audio = timeout 30s wf-recorder -a -p crf=28 -t -o HDMI-A-2 -f "/home/pi/Videos/screencast-$(date +%Y-%m-%d_%H-%M).mkv"

On the first line we define the shortcut, on the second line the command that should be executed.

I have setup 4 shortcuts to:

  1. record screen 1 by pressing SUPER + CTRL + 1
  2. record screen 1 with audio  by pressing SUPER + ALT + 1
  3. record screen 2 by pressing SUPER + CTRL + 2
  4. record screen 2 with audio by pressing SUPER + ALT + 2

Of course you can change the shortcuts to your liking.

I choose to record just 30 sec, it will stop automatically. In Linux you can do that simple with timeout 30s command

The moment I’m typing this blog-post, I realize it is probably better to add another 5th shortcut to kill/stop the recording, so you could make recordings with variable duration.

Well not that difficult, just bind a shortcut to

killall -s SIGINT wf-recorder

And remove the `timeout 30s` part.

wf-recorder only records screen updates by default, so recording a static desktop will output an empty file 😉 Nothing to record when nothing is happening, saving MB’s on file size. Add -D to record every frame.

No Comments

Controlling the Fan of the Raspberry Pi 5 in Ubuntu 23.10

Thursday, November 9th, 2023

The new Raspberry Pi 5 is a really nice upgrade. Both RaspberryPiOS and Ubuntu 23.10 are really running much faster on the new model then on a RPI 4.

Booting RaspberryPiOS takes around 12sec on a ordinary SanDisk SD card. The fan is running full speed at boot, but is slowing down afterwards. And it has not started again during browsing a few websites.

Ubuntu boots a bit slower, but GNOME 3 is also running really fine. Ubuntu is visually more attractive, and it’s really running smooth.

There is a big annoyance for the moment and that is the fan. It is running full speed at boot and keeps running all the time full speed, making to much noise.

Fan control doesn’t seem to work yet, but controlling the fan can be done manually by writing a number in the range 0 (off) to 4 (full speed) to /sys/class/thermal/cooling_device0/cur_state

So I created a startup service that slows down the fan on Ubuntu after boot to speed setting 1, and that is inaudible.

[Unit]
Description=RPI-startup Fan Control service
After=multi-user.target
[Service]
User=root
Type=oneshot
ExecStart=/bin/bash -c "echo '1' | tee -a /sys/class/thermal/cooling_device0/cur_state" &
[Install]
WantedBy=multi-user.target

Copy above content to a file /etc/systemd/system/fan.service.

And enable it by:

sudo systemctl enable fan.service

That’s all, no reboot the Pi and Ubuntu will be silent.

Remember the Raspberry Pi willl automatically throttle when reaching a temperature of 85°. So there is no danger in letting the fan run on speed 1 continuously. Even when your compiling the Linux Kernel.

Off course you can always check the temperature with, and yes that works also in Ubuntu 23.10 on the Pi

sudo vcgencmd measure_temp

You can always bump up the speed to 3 by issuing this in the terminal

echo '3' | sudo tee -a /sys/class/thermal/cooling_device0/cur_state


No Comments

Raspberry Pi 5 FAQ

Wednesday, October 4th, 2023

Can the RPI5 suspend to RAM?

Yes, but not yet. Here an RPI engineer states that a future firmware update could implement it. And in the new HAT+ spec for newer HAT+ introduced with the RPI5 that is confirmed. The older HAT was introduced in 2014, so nearly ten years later there is the preliminary HAT+ spec (PDF).

In the spec Chapter 3. Power States:

Raspberry Pi supports the following power states:

  • OFF
    No power connected to the board (the board unplugged).
  • WARM-STANDBY
    The Raspberry Pi is halted/off, but all of the power rails are still enabled. This is the default mode when doing a sudo
    halt or soft power-button-off operation.
  • STANDBY
    The Raspberry Pi has the 5V rail powered — so the power management chip is powered — but no other power
    supplies on the PMIC and board are enabled. You can configure sudo halt or power-button-off using the EEPROM to
    enter this mode instead of WARM-STANDBY.
  • SLEEP
    Some rails are off — notably the CPU core — and Linux is in suspend-to-RAM state. Pressing the power button will
    cause the system to move to the ACTIVE state.
  • ACTIVE
    All rails are up and everything is running, e.g. running desktop Linux.

NOTE: The SLEEP state is not currently supported on Raspberry Pi 5.

So sleep state AKA suspend-to-RAM is coming to the Raspberry Pi 5. Just wait for the future firmware update.

I hope WOL (WakeOnLan) is also coming, rumors (Jeff Geerling) are there, not confirmed yet.

What is the official name of the new RPI 5 device: Raspberry Pi 5 or Raspberry Pi 5 Model B?

That is unclear. 🙂 .

According to mother Lady Raspberry Pi Herself Liz Upton it’s  Raspberry Pi  5

According to father engineer James it does include B in the name: it’s Raspberry Pi 5 Model B

According to the Raspberry Pi 5 itself it’s: Raspberry Pi 5 Model B Rev 1.0

Rev here stands for revision and gives an indication that there has been a small update/patch to the hardware. Of course this name is partly depending of the software/firmware and hardware/revision.

Can I use the same camera cables as for the Raspberry Pi 4?

No, the Raspberry Pi 5 needs another type of cable. Because the connectors are smaller, it uses higher-density pinout variant of the camera cable.

In fact it uses the same cables as a Raspberry Pi Zero (2). So if you have a couple of them, you’re OK.

Does the Raspberry Pi 5 need a new Power Supply?

No, you can run the Raspberry Pi with the trusty Raspberry Pi 4 power supply. It will downstream USB current to 600mA. However, the Raspberry Pi 5 can be more power hungry, and if you really need more power on the USB ports, you better use the new Raspberry Pi 5 power supply. It will more than double the output to 1.6A.

All things considered the new Power Supply is not a bad deal. It will cost you 12 bucks, but it does support PD, and you can even charge your Apple MacBook Pro laptop or your phone.

What about the RPIBOOT mode of the Raspberry Pi 5

If you connect a laptop to the Raspberry Pi 5 USB-C port, so you’re powering the Raspberry Pi5 from your laptop instead of a power supply (yes, that also works on the Raspberry Pi 4), and you press and hold the new power button before connecting the USB-C cable, the Raspberry Pi 5 will boot into USB boot mode; this way the host machine can upload new firmware into the Raspberry Pi 5.

Why does the Raspberry Pi 5 not have an external WiFi Antenna Connector?

Space, and it would be more expensive because you’ll need to cover approval-costs for compliance.

How do I enable USB-boot when I’m using a Raspberry Pi 4 15w power supply instead of the 27w Raspberry Pi 5 power supply?

It will show a warning, stop booting, and you’ll need to press the power button before is continues booting.

Or add this to  `/boot/firmware/config.txt`

usb_max_current_enable=1

See the docs.

2 Comments

The new Raspberry Pi 5 has arrived (in specs)

Saturday, September 30th, 2023

A new Raspberry Pi 5 is introduced, and contrary to earlier launches, the new device is not available yet for customers. It will be on the shelves around the 23rd of October.

This creates a period of time in which the new open-source software can be pushed into the open, and merged with existing repositories. When the boards are shipped in the end of October, the update free open source software is in place.

The new Pi is about twice as fast as the RPI4, memory bandwidth and latency have improved, the same for the I/O. For example WiFi speed is twice as fast, due to the new improved I/O, the WiFi chip itself is the same as in the Pi 4. SD-card speed is twice as fast.

Nearly all parts have been upgraded. A Real Time Clock is a new welcome addition. A fan socket. A power button has been added.

Key features include:

  • 2.4GHz quad-core 64-bit Arm Cortex-A76 CPU
  • VideoCore VII GPU, supporting OpenGLES 3.1, Vulkan 1.2
  • Dual 4Kp60 HDMI® display output
  • 4Kp60 HEVC decoder
  • Dual-band 802.11ac Wi-Fi®
  • Bluetooth 5.0 / Bluetooth Low Energy (BLE)
  • High-speed microSD card interface with SDR104 mode support
  • 2 × USB 3.0 ports, supporting simultaneous 5Gbps operation
  • 2 × USB 2.0 ports
  • Gigabit Ethernet, with PoE+ support (requires separate PoE+ HAT, coming soon)
  • 2 × 4-lane MIPI camera/display transceivers
  • PCIe 2.0 x1 interface for fast peripherals
  • Raspberry Pi standard 40-pin GPIO header
  • Real-time clock
  • Power button

SD-card transfer speed for Raspberry Pi’s

Let’s take a look at the new SD-card speed. A simple benchmark is hdparm for reading speed:

sudo hdparm -t --direct /dev/mmcblk0

So in this post we compare some benchmarks of the new Raspberry Pi 5 and earlier models.

Explaining Computers is getting this speed for a SD-card in the new RaspberryPi 5 (RPI5):

Raspberry Pi 5 SD-card transfer speed

/dev/mmcblk0:
Timing O_DIRECT disk reads: 258 MB in 3.01 seconds = 85.69 MB/sec

Raspberry Pi 4 SD-card transfer speed

/dev/mmcblk0:
Timing O_DIRECT disk reads: 258 MB in 3.01 seconds = 41.15 MB/sec

Raspberry Pi 400 SD-card transfer speed

We did our own test with a Raspberry Pi 400 and actually we achieved a similar speed:

/dev/mmcblk0:
Timing O_DIRECT disk reads: 126 MB in 3.02 seconds = 41.76 MB/sec

A Raspberry Pi 4 or 400 also doubled the SD-card speed compared to older models, so let’s test a RPI 2:

Raspberry Pi 2 SD-card transfer speed

/dev/mmcblk0:
Timing O_DIRECT disk reads: 66 MB in 3.08 seconds = 21.41 MB/sec

Raspberry Pi Zero SD-card transfer speed

/dev/mmcblk0:
Timing O_DIRECT disk reads: 64 MB in 3.04 seconds = 21.02 MB/sec

Raspberry Pi Zero 2 SD-card transfer speed

/dev/mmcblk0:
Timing O_DIRECT disk reads: 62 MB in 3.00 seconds = 20.65 MB/sec

SD-card RPI5 speed has quadrupled since the RPI2

An yes, the SD-Card speed has quadrupled moving from an original RPI to the new RPI5.

That is not bad.

We also tested the Compute Model 4 with eMMC:

Raspberry Compute Model 4 eMMC transfer speed

/dev/mmcblk0:
Timing O_DIRECT disk reads: 244 MB in 3.00 seconds = 81.22 MB/sec

So the new RPI5 is reading faster from an SD-card then the CM4 is reading from eMMC!

That is a surprise, and AFAICS, this is all related to the much improved I/O at the new RPI5.

Remember, WiFi is twice as fast, and it still has the same WiFi hardware.

USB speeds is now 5GB each on the USB ports, in the RPI4 5GB was shared.

So it seems the new Raspberry Pi 5 is a nice upgrade for just 5 dollars, a new Raspberry Pi 5 4GB/8GB is just 5 dollars more expensive than the Raspberry 4.

SD benchmark transfer speed various Raspberry Pi models

sudo hdparm -t --direct /dev/mmcblk0
Model SD card Speed
RPI 5 (Expl. Comp.) 85.69 MB/sec
CM 4 (eMMC) 81.22 MB/sec
RPI 400 41.76 MB/sec
RPI 4 41.15 MB/sec
RPI 2 21.41 MB/sec
RPI Zero 2 20.65 MB/sec
RPI Zero 21.02 MB/sec

Greetings.

3 Comments

Scanning the WiFi network with the Raspberry Pi Pico W

Friday, July 22nd, 2022

Let’s try the Wifi features of the new Raspberry Pi Pico W.

The Pico W has two Wifi interfaces:

  • network.STA_IF, the station interface
  • network.AP_IF, the access-point interface

network.STA_IF

The station (or standard) interface, can be used to connect the Pico W to another 2.4GHz WiFi access point. This seems to be the default.

network.AP_IF

The access-point interface can be used to turn your Pico W into a WiFi access-point that can connect up to 4 devices at the moment.

Use the Pico W to scan access points

Let’s try out the station interface, network.STA_IF.

Using micropython it’s really a breeze:


import network
import binascii
wlan = network.WLAN() #  network.WLAN(network.STA_IF)
wlan.active(True)
networks = wlan.scan() # list with tupples with 6 fields ssid, bssid, channel, RSSI, security, hidden
i=0
networks.sort(key=lambda x:x[3],reverse=True) # sorted on RSSI (3)
for w in networks:
      i+=1
      print(i,w[0].decode(),binascii.hexlify(w[1]).decode(),w[2],w[3],w[4],w[5])

In most example code you need to specify the interface, but apparently it defaults to the standard station network.STA_INF interface.

The output is a list with tupples that according to the docs should contain six fields ssid, bssid, channel, RSSI, security, hidden.

The bssid is the same as the hardware unique MAC-address.

There are five values for security:

  1. open (0)
  2. WEP (1)
  3. WPA-PSK (2)
  4. WPA2-PSK(3)
  5. WPA/WPA2-PSK (4)

and two for hidden:

  1. visible (0)
  2. hidden (1)

The docs states that for hidden 0 = visible and  1 = hidden, but actually the output I get, some twenty networks(!?) gives no 0, but several undocumented values for hidden: 1,2,3,4,5,7.

Twenty WiFi-networks? Yes, I do work in a city. And that’s only the 2.4GHz band. 🙁

So what does those values mean, what is there more than visible or hidden?

Also the security results differ with outputs from 0 (=open), most 5, but some report 7.

What do those values for security mean?

Is it a bug or a (undocumented) feature?

No Comments

Raspberry Pie with a Taste of Chocolate, the funny Desktop Droste effect

Tuesday, June 28th, 2022

The original Droste Effect

Trying out the new Ubuntu 22.04 on my Raspberry Pi 400, I was surprised by the smoothness of the new Ubuntu distribution. Much better impression then the first time I tried Ubuntu on the RPI, I think that was the 20.10 release.

A funny thing to try out, especially if you love fractals or you are an admirer of the Dutch graphic artist Escher who’s work features features mathematical and even impossible objects, is the subject of this post.

Another returning phenomenon in his drawings and paintings is the Droste-effect , and I’ll shwo you how to create a Droste effect on your Raspberry Pi with a few mouse-clicks.

Creating a Droste effect on your Raspberry Pi

Yes, you can do that with just a couple of mouse-clicks, you don’t need a mathematical package or a graphical editor like Gimp or so.

Trying out the new Gnome Desktop Sharing feature, which let you share your desktop not only with the older VNC protocol, but also with the newer RDP protocol, gave me this idea.

To activate:

Settings -> sharing -> enable -> enable Remote Desktop -> and setup some authentication: username and password

For creating the Droste-effect we gonna do something silly: we gonna connect to our-self! Yes a Remote Desktop Connection with a local client.

A Remote Desktop Connection with a local client

Introspection!

Start up the default remote desktop client Remmina.

Quick setup a new connection, enter your IP-address and the authentication you just entered: username and password.

To find your IP-address, open a terminal, (CTRL ALT T) and type `ip address` return. Then you will find it in the output, or look it up under details in the network settings.

Save and connect in the Remmina dialog, and see the connection being made.

Click the `Toggle Scaled Mode` button to rescale the desktop (CTRL_R S), and there it is.

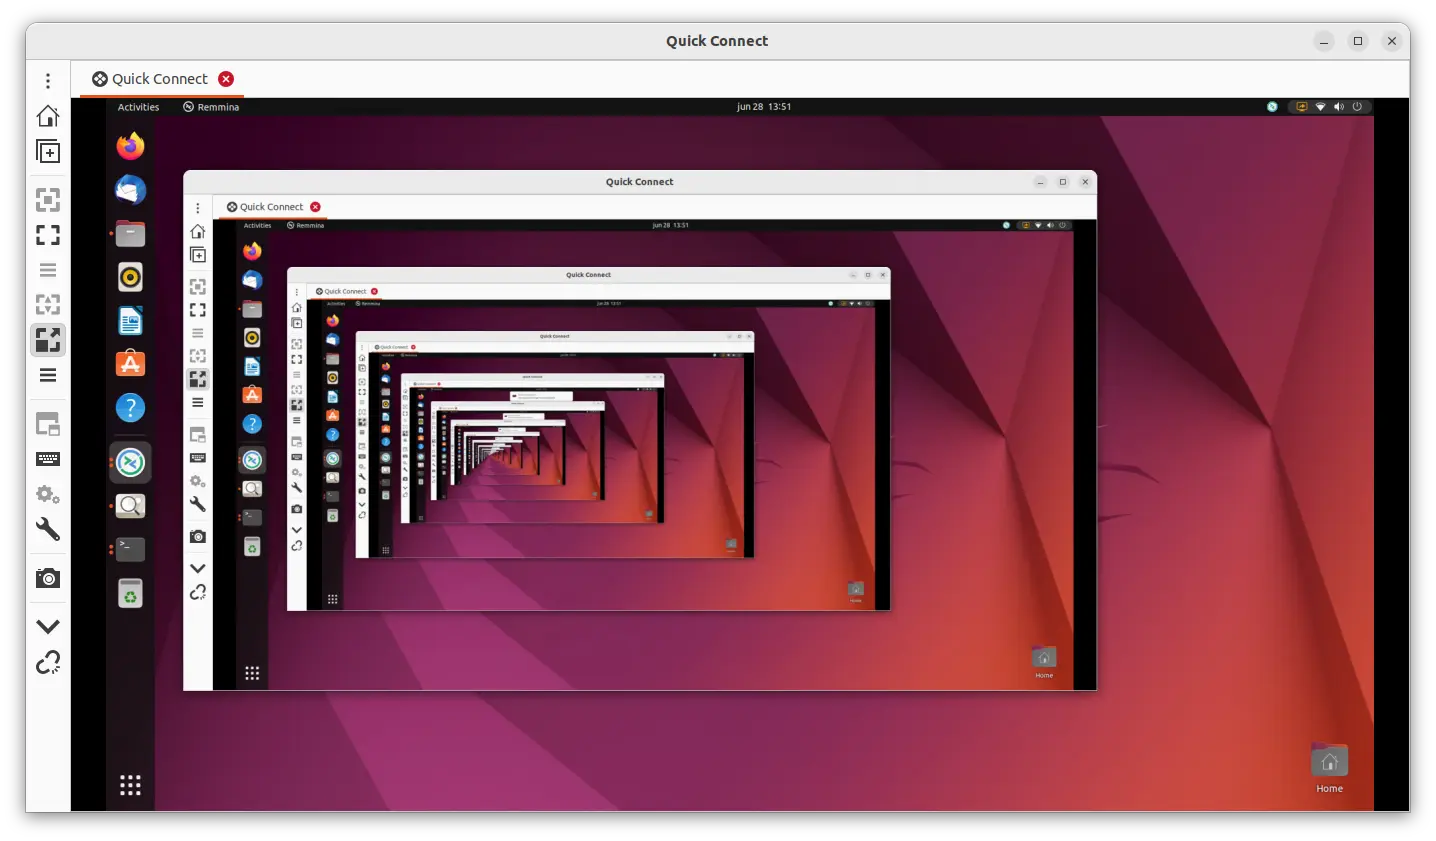
A nice Raspberry Pi Droste Effect of the Ubuntu Desktop in a local remote Desktop connection: 🙂

Remmina Droste effect

Remmina Droste effect

Gnome-connections

An alternative to `Remmina` is Gnome-connections. That program is in development, but like all Gnome apps, it does offer an very easy and intuitive approach.

Can all the settings in Remmina be overwhelming, gnome-connections is easy as it can be.

But the default resolution seems to be quite poor. And I could not find a scaling options, so you end up with a more spacey psychedelic form of computer art.

The Gnome-Connections Art

The Gnome-Connections Art

Cool as well.

Update: Actually there is a scale setting for Gnome-Connections, a bit hidden, under properties once you established a connection. Using Gnome-connections for managing my Pi400 from another Ubuntu 22.04 is working quite well, although I had to restart the Pi400 to get control working.

So maybe Gnome-connections is lacking a lot of settings, it’s working out of the box surprisingly well in Ubuntu 22.04.

Give it a try, if you own a Pi.

How does the Pi create a Droste effect?

You open up a program that shows your complete desktop scaled including the program that shows your desktop scaled, etc etc.

Actually I was expecting a crash, or out of memory error, you will probably get that when you let it run for hours, but the Raspberry Pi kept being responsive for the couple of minutes I tried. Enough time to take a screenshot.

So it seems Ubuntu and Gnome are much more optimized for running on less powerful hardware in 2022 then a couple of years ago.

This funny showcase of the Droste-effect is the prove, and that is all a big win.

Please let me know what you think in the comments.