Posts Tagged ‘ubuntu’

No Comments

Improving accessibility in Ubuntu for the visually impaired with a narrow field of vision

Thursday, August 24th, 2023

For a visually impaired person with a very narrow field of vision it can be difficult to locate the mouse on the screen.

Imagine someone with glaucoma, they are looking through a straw, so they have to scan the screen from left top to right bottom (or sometimes even a sentence character by character).

So what you want sometimes is to move the mouse to the center of the screen or some other easy to spot location.

Historically you could use xdotool for that, but xdotool doesn’t work with Wayland,  and in Wayland there is no out-of-the-box tool to do it.

There a a few options as an alternative:

  • wtype
  • ydotool
  • dotool

wtype is available in the deb repository, so it can be installed with

sudo apt install wtype

BUT

it doesn’t work with Gnome.

`Compositor does not support the virtual keyboard protocol`

I’m not sure if that’s a lacking Gnome feature that will be resolved sooner or later, but IMHO it makes wtype useless for the common Ubuntu user.

Second is ydotool, but that is quite a hassle to install, although there are detailed instructions, so I decided to give the alternative dotool a try.

Follow the instructions (Clone the repo and run install).

Next I created a small bash script


#!/usr/bin/bash
echo "mouseto .5 .5" | dotool

Then simple add a custom shortcut to your script with absolute path and you’re done.

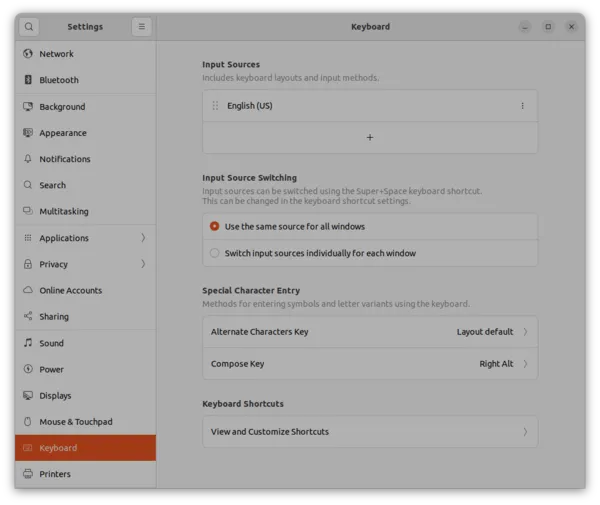
Open Settings -> Keyboard

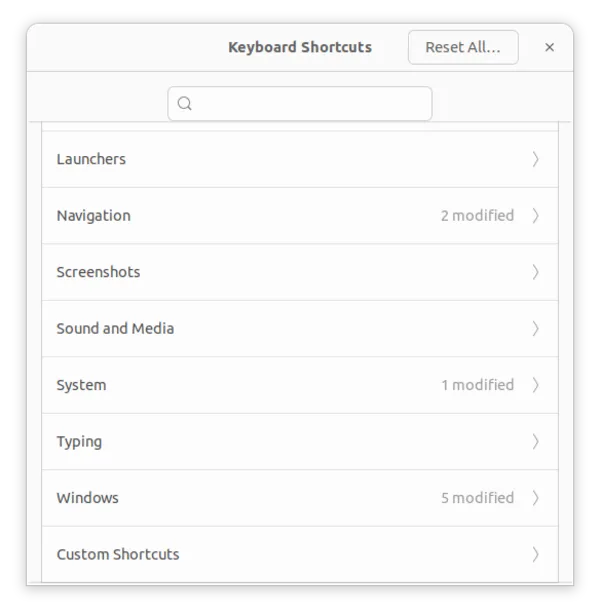
Choose View and Customize shortcuts -> Custom Shortcuts


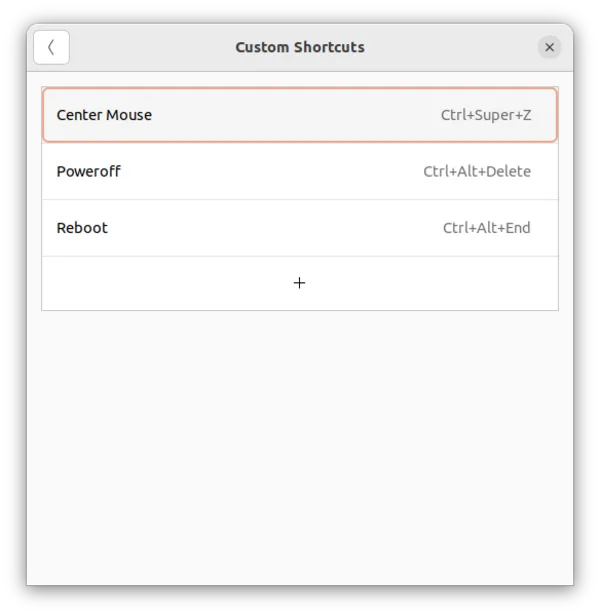
And add your shortcut.


That is all. Now you can easily center the mouse with pressing CTRL SUPER Z.

Remember SUPER is the windows key, normally next to the left CTRL key.

Actually the script will center on the total desktop, so when you use two monitors with extended desktop it won’t center on your screen. 😉

No Comments

Using an external AOC touchscreen on Ubuntu

Wednesday, March 1st, 2023

TL;DR

Using an external portable AOC 16T2 monitor as a secondary screen works well on a Ubuntu laptop, but it needs a bit of tweaking.

xinput map-to-output 14 HDMI-A-0

Connecting a touchscreen to an Ubuntu Laptop

One of the first things you’ll do when connecting an USB device, getting info about the device. Is it recognized? Issue an lsusb before and after connecting the device and watch the difference. In this case:

Check connected USB-devices in Linux

lsusb
Bus 001 Device 011: ID 1fd2:9004 Melfas LGDisplay Incell Touch

So Ubuntu does recognize the AOC 16T2 monitor as a touch-device.

For that of course an USB-C (3.0) display cable is necessary, touch information is not transferred over an HDMI cable, in that case you’ll need another USB-C cable, a USB-C 2.0 version is sufficiant.

Another check if the screen is recognized as a touchscreen, issue the xinput command, before and after

Check input devices in Linux

xinput
Melfas LGDisplay Incell Touch id=14 [slave pointer (2)]

Check connected screens in Linux

To check screen use xrandr.

xrandr
HDMI-A-0 connected

Using a touchscreen on Ubuntu, and using a touchpad at the same time causes some confusion. At the moment you use the touchscreen your mouse disappears. That does make some sense, otherwise you feel urged to move the mouse, which is of course not needed on a touchscreen.

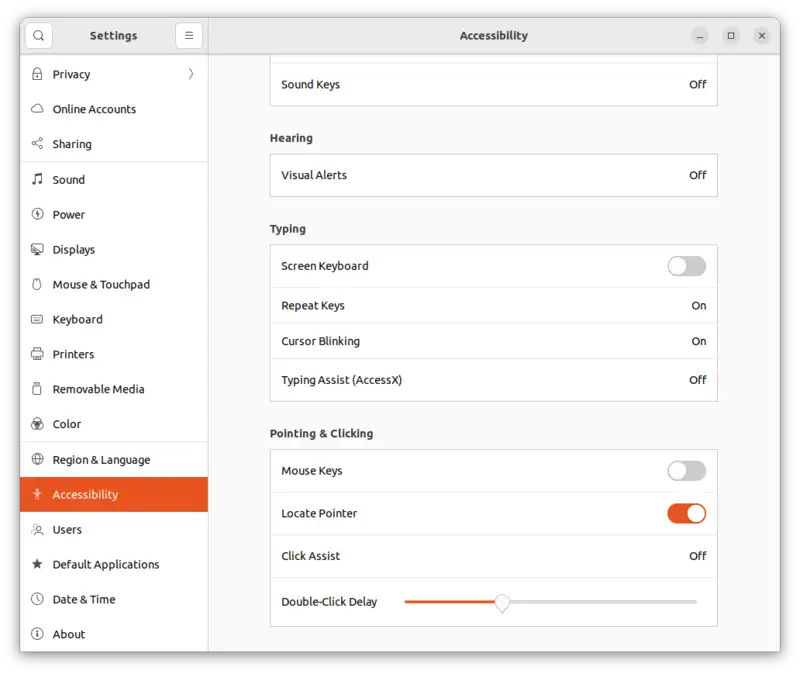
Tip: enable locate pointer when using touchscreen

Enable the locate pointer settting in the accessibilty settings, helps you to find you’re invisible mouse. Press CTRL and you can find your mouse-position again.

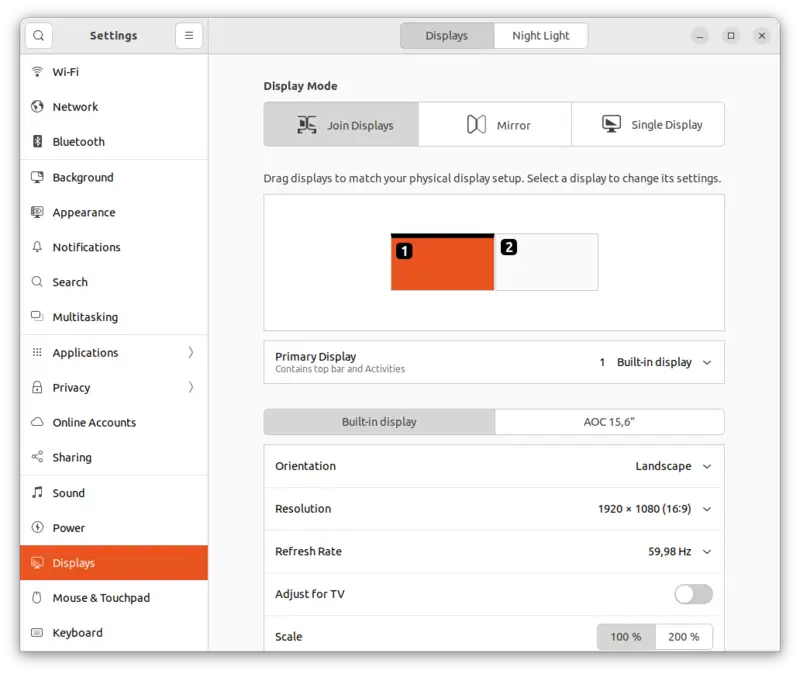
Once you’re used to that, an external touchscreen works rather strange out of the box, when you’re using join display, extended desktop as a default for attaching an external monitor, which is wanted in most cases.

Strange default in Ubuntu using secondary touchscreen.

Visual the desktop is extended, but for touch-input it is not. SO the visual-desktop is different than the (touch) input-desktop. That means when you click on the second monitor, the gesture is interpreted like you touch on the first monitor.


And I tried but this cannot be solved by changing the order of screens in the display-setting, moving the external monitor to the left.

To get it working you’ll need to issue a command in the terminal.

Making a external touchscreen working in Ubuntu

To map the touch.input-desktop to the visual-desktop:

xinput map-to-output 14 HDMI-A-0

This will map the touch-desktop to the secondary AOC touchscreen.

You do wonder why this is not the default in Ubuntu. I’m not sure, maybe it was in earlier days.

But this is not working in Wayland

And there is a bigger problem. This solution works only in X11 window server, not in the new Wayland environment, which is the default nowadays in nearly all modern Linux desktop, including Ubuntu 22.04 LTS.

As it seems xinput does not find your touchscreen annymore, so no mapping can be done.

Wayland does recognize the touchscreen, there is no option yet to map  it to the right screen.

That is plain stupid a pity.

So that means you have to logout/login and switch to X11 to use your external touchscreen.

Hopefully this will fixed soon.

No Comments

Trouble updating some packages in Ubuntu 22.04, because they are kept back

Tuesday, January 17th, 2023

Maybe you have seen this message more often then before, while updating your computer manually through the terminal:

The following packages have been kept back:
<package-name>
0 upgraded, 0 newly installed, 0 to remove and 1 not upgraded.

Historically that could be the case with the classic commands

sudo apt update && sudo apt upgrade

Because that command is careful (doesn’t update) about packages that can introduce dependency conflicts

But that update command has been superseded by

sudo apt update && sudo apt full-upgrade -y

The latter commands also remove packages to resolve dependency conflicts, and in most cases that is everything you want.

But now upgraded to Ubuntu 22.04 I see the kept back message more and more, even when I did a sudo apt update && sudo apt full-upgrade -y

And as it seems, that is absolutely OK, it’s part of the new phased roll-out mechanism. Packages that can break things are introduced in batches. First only a small percentage of users are getting the new version, so if there are bugs, only a small number of people are hit, and the bugs can be fixed before it is introduced on a bigger scale.

How to check if packages are `phased`

apt-cache policy <package-name>

e.g. gnome-remote-desktop

apt-cache policy gnome-remote-desktop 
gnome-remote-desktop:
Installed: 42.4-0ubuntu1
Candidate: 42.7-0ubuntu1
Version table:
42.7-0ubuntu1 500 (phased 0%)
500 http://nl.archive.ubuntu.com/ubuntu jammy-updates/main amd64 Packages
*** 42.4-0ubuntu1 100
100 /var/lib/dpkg/status
42.0-4ubuntu1 500
500 http://nl.archive.ubuntu.com/ubuntu jammy/main amd64 Packages

Just be a little patient. The update will normally come in a few days.

1 Comment

Find the total size of certain files within a directory tree before deleting them

Friday, January 13th, 2023

Normally I use find, as it is installed by default on any Linux computer or server or terminal I worked with, but lately on my desktop I start using `fdfind` more and more.

Why? Its faster and easier to work with than find.

I really like the user-friendly syntax of `fd` AKA `fd-find` or `fdfind` compared to the classic `find` command.

In Ubuntu the program is installed with `sudo apt install fd-find` and executed as `fdfind`

`fd` uses a regex as the standard search pattern.

Time for some examples.

To find all files in a directory tree that have jpg in their name

Very intuitive and concise.

fdfind jpg

To find all jpg files (extension jpg) in a directory tree

Think I need all files with [e]xtension jpg, the command is again very intuitive:

fdfind -e jpg

To delete all jpg files in a directory tree

Think I need all files with [e]xtension jpg then e[x]ecute a command to delete them [rm], the command is very intuitive:

As the normal delete command in bash is `rm`

fdfind -e jpg -x rm

That’s all.

Another interesting thing to know, what disk-space I’m gonna win by deleting all jpg files.

Find the total size of jpg files within a directory tree (wrongly)

Think: I need all files, and then calculate the filespace of all files.

The normal command of getting a total size of several files is use `du -ch *.jpg` This will list of files and Count a total on the last line. To get just the last line. pipe it to tail, to gets just the last line.

du -ch *.jpg |  tail -1

But du doesn’t work recursive in subdirectory. You can use a trick with globstar, but much easier is it to combine with fd, so you would come to something like this.

fdfind -e jpg -x du -ch | tail -1

But that doesn’t work right, it seems to computes totals for every file, and just show to size of the last result.

Find the total size of jpg files within a directory tree (correctly)

We need the `-X` option here the `execute-batch` command, that runs the command only once on all search results as arguments

fdfind -e jpg -X du -ch | tail -1

Find correctly find the total size of jpg files in a directory and the first level of subdirectories

And with `fdfind` command it’s easy to control Depth, just add a -d option. This will only search in the main and the first subdirectory level.

fdfind -d 2 -e jpg -X du -ch | tail -1

And now you ask yourself. Can I find the size of all jpg files in the third level of subdirectories.

Of course! And easier than you think

Find the total size of jpg files in the third level of subdirectories depth

fdfind --min-depth 4 --max-depth 4 -e jpg -X du -ch | tail -1

See more:

https://github.com/sharkdp/fd

No Comments

Firefox and Wayland support on Ubuntu snaps and the user-agent

Friday, January 6th, 2023

Ubuntu 22.04 is shipping with Wayland as the default communication protocol for the display server, replacing the old and X11 (X Window System).

Interestingly although Firefox is supporting Wayland natively, the default stable Firefox snap package doesn’t use it. I is still using XWayland as compatibility layer.

How to check if Firefox is using Wayland or X11?

Open:

about:support

and search for `Window protocol`

Window Protocol xwayland

That is intentional, see

https://bugzilla.mozilla.org/show_bug.cgi?id=1631462#c21

So what about Firefox Beta? To install Firefox Beta snap next to Firefox stable, see the earlier blog-post Install seperate Fiefox Beta snap.

Open

about:support

And search for `Window protocol`

Window Protocol wayland

Note the missing X, that means Wayland is used as the communication protocol.

Why doesn’t show Wayland in the User-Agent header of Linux browsers?

To check the the User-Agent in Firefox Beta, navigate to something like a ip-address checker:

Mozilla/5.0 (X11; Ubuntu; Linux x86_64; rv:109.0) Gecko/20100101 Firefox/109.0

Although X11 is not used, it still shows X11. I wonder if that is intentional? Probably that is. User-Agent strings are hampered by historical mistakes, like browser-sniffing.

And setting a detailed User-Agent is also a privacy and security risk. Giving to much and unnecessary information about your system. So it is about limiting exposure to browser-fingerprinting.

Be aware this sucks, once you’re aware there is market-power in user-agents. The major players make the rules of the game.

No Comments

Raspberry Pie with a Taste of Chocolate, the funny Desktop Droste effect

Tuesday, June 28th, 2022

The original Droste Effect

Trying out the new Ubuntu 22.04 on my Raspberry Pi 400, I was surprised by the smoothness of the new Ubuntu distribution. Much better impression then the first time I tried Ubuntu on the RPI, I think that was the 20.10 release.

A funny thing to try out, especially if you love fractals or you are an admirer of the Dutch graphic artist Escher who’s work features features mathematical and even impossible objects, is the subject of this post.

Another returning phenomenon in his drawings and paintings is the Droste-effect , and I’ll shwo you how to create a Droste effect on your Raspberry Pi with a few mouse-clicks.

Creating a Droste effect on your Raspberry Pi

Yes, you can do that with just a couple of mouse-clicks, you don’t need a mathematical package or a graphical editor like Gimp or so.

Trying out the new Gnome Desktop Sharing feature, which let you share your desktop not only with the older VNC protocol, but also with the newer RDP protocol, gave me this idea.

To activate:

Settings -> sharing -> enable -> enable Remote Desktop -> and setup some authentication: username and password

For creating the Droste-effect we gonna do something silly: we gonna connect to our-self! Yes a Remote Desktop Connection with a local client.

A Remote Desktop Connection with a local client

Introspection!

Start up the default remote desktop client Remmina.

Quick setup a new connection, enter your IP-address and the authentication you just entered: username and password.

To find your IP-address, open a terminal, (CTRL ALT T) and type `ip address` return. Then you will find it in the output, or look it up under details in the network settings.

Save and connect in the Remmina dialog, and see the connection being made.

Click the `Toggle Scaled Mode` button to rescale the desktop (CTRL_R S), and there it is.

A nice Raspberry Pi Droste Effect of the Ubuntu Desktop in a local remote Desktop connection: 🙂

Remmina Droste effect

Remmina Droste effect

Gnome-connections

An alternative to `Remmina` is Gnome-connections. That program is in development, but like all Gnome apps, it does offer an very easy and intuitive approach.

Can all the settings in Remmina be overwhelming, gnome-connections is easy as it can be.

But the default resolution seems to be quite poor. And I could not find a scaling options, so you end up with a more spacey psychedelic form of computer art.

The Gnome-Connections Art

The Gnome-Connections Art

Cool as well.

Update: Actually there is a scale setting for Gnome-Connections, a bit hidden, under properties once you established a connection. Using Gnome-connections for managing my Pi400 from another Ubuntu 22.04 is working quite well, although I had to restart the Pi400 to get control working.

So maybe Gnome-connections is lacking a lot of settings, it’s working out of the box surprisingly well in Ubuntu 22.04.

Give it a try, if you own a Pi.

How does the Pi create a Droste effect?

You open up a program that shows your complete desktop scaled including the program that shows your desktop scaled, etc etc.

Actually I was expecting a crash, or out of memory error, you will probably get that when you let it run for hours, but the Raspberry Pi kept being responsive for the couple of minutes I tried. Enough time to take a screenshot.

So it seems Ubuntu and Gnome are much more optimized for running on less powerful hardware in 2022 then a couple of years ago.

This funny showcase of the Droste-effect is the prove, and that is all a big win.

Please let me know what you think in the comments.