The covid lock-down is sentencing a lot of people to work from home. For that we need webcams, a new pc, better monitor and other equipment. The Raspberry Pi 400 is a great and affordable second desktop, it’s the fastest Pi available suited for desktop use. It lacks a camera connector, so you need a Zero to connect a camera board.
So what about reusing that old gadget that was collecting dust in the drawer: a small and cheap Raspberry Pi Zero. If you also happen to own a camera board for that little computer, here is a nice project showmewebcam to turn that cheap computer into a handy webcam. It uses a small Buildroot Linux version and boots really fast.
And now that project has been forked on Github: showmewebcam-usbboot. No SD-card needed. That project will let the Raspberry Pi Zero boot over USB!
If you don’t have a camera board. You can buy a clone version of the v1 board for a few dollars in China, or get a v2 board or for the best results the really great HQ-camera board.
Interested in photography, that High Quality camera board can do some really great macro-photography.
Cheap Raspberry Pi webcam
With the Raspberry Pi Zero costing about 5 euro, and a clone camera board around 3 euro on AliExpress, you can have a very nice and decent webcam for less then 10 euro’s. And that is a bargain. Remember you don’t need an SD card. So save on the hardware where you can.
How does it work?
How does the Pi boot then? Over USB, so you do need the usbboot/rpiboot tool. That is free and opensource software made by the Raspberry Pi organization, a program that makes the Raspberry P Zero boot by pushing the operating system over USB.
Let’s try it out. I’m using an Ubuntu desktop.
Step 1: download showmewebcam-usbboot
Download the latest release .
Unzip it. You will extract a directory called showmewebcam-usbboot.
Step 2: install usbboot/rpiboot
If you have already installed a version of this tool, you can of course skip this tool and jump to step 3.
Download the usbboot/rpiboot, unzip it and build it according to the instructions.
Step 3: Connect the raspberry Pi Zero
(with installed camera board) by putting the USB plug into the middle USB connector.
Step 4: boot the webcam
You can start the webcam by executing the rpiboot tool and pointing it to the unzipped showmewebcam-usbboot directory
sudo ~/usbboot/rpiboot -d ~/showmewebcam-usbbootAfter about half a minute booting the Raspberry Pi Webcam will be ready.
How to use the Webcam on the PC
For a quick start, and when no other cam is connected, you can start the webcam with (Ubuntu):
mpv /dev/video0On a laptop with a build-in webcam the command that you have to issue will be :
mpv /dev/video2
To control your cams on the PC, you need `v4l-utils` (apt install v4l-utils)
To set the resolution
v4l2-ctl --set-fmt-video=width=1280,height=720 -d /dev/video2To list all video devices:
v4l2-ctl --list-devicesTo list the specs of your video devices:
v4l2-ctl --list-formats-extffmpeg -f v4l2 -list_formats all -i /dev/video2A serial connection will also be available, so you can connect to the Webcam to control the settings and do debugging. That works exactly the same as in showmewebcam
Control the webcam
Finer control offers the camera-ctl tool on the Zero
Connect to the Zero:
sudo screen /dev/ttyACM0 115200 Start the tool # /usr/bin/camera-ctl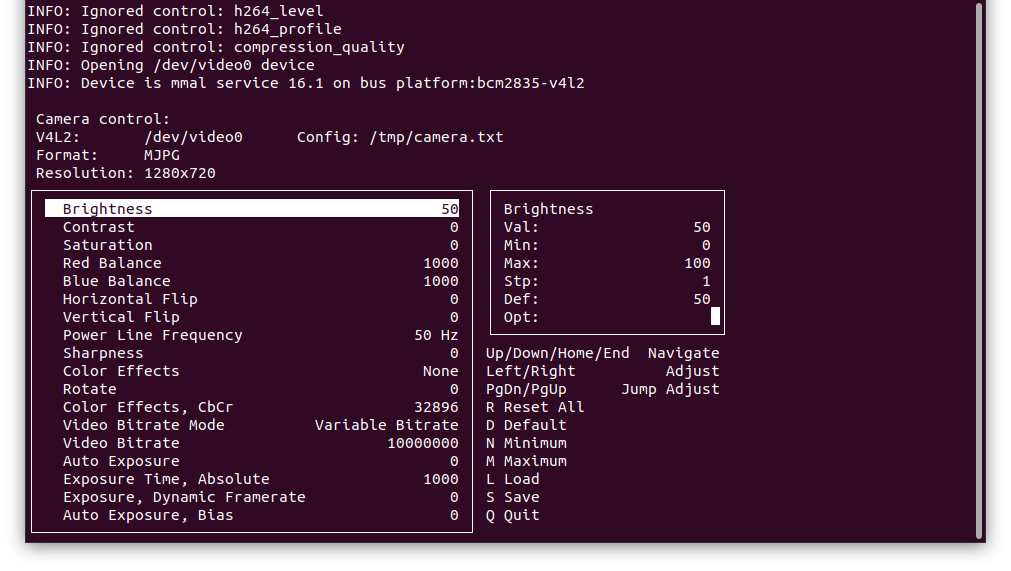
Controlling the webcam with camera-ctl
Create a stereo webcam
The tool will let you boot more then one Raspberry Pi Zero from the same directory. Just connect the two Raspberry Pi Webcams and start the tool. One will boot, just execute the tool another time and the other one will boot.
The webcams will be available as /dev/video0 (you) and /dev/video2 (your cat) on your Pi400.
Now make that video call with your boss, and ask for a raise. Switch the webcam to your cat the moment you stopped speaking.
What can showmewebcam-usbboot do what showmewebcam can’t do?
Nothing. It can do the same with less hardware, because it doesn’t need an SD card. But is does need extra software, which can limit compatibility. It also boots slower.
It hasn’t been tested that much.
Have fun, try it out, en let me now your thoughts!
Links:
- https://github.com/Janghou/showmewebcam-usbboot
- https://github.com/showmewebcam/showmewebcam/
- https://github.com/raspberrypi/usbboot
- https://github.com/peterbay/uvc-gadget
Tags: rpi
January 11th, 2021 at 1:17 pm
This works great. Much easier then I thought.
February 12th, 2021 at 3:33 am
Can I run rpiboot on a raspberry pi 3 and connect a raspberry pi z with a camera but without micro sd? Basically have a couple RPI Z’s boot from one RPI 3?
February 13th, 2021 at 2:22 pm
Yes, how many Zero’s depends of your power supply. I ran two Zero’s powered from a RPI2.