Archive for the ‘raspberrypi’ Category

5 Comments

Kodi on Bullseye, playing 4K on the RPI4

Friday, March 18th, 2022

Getting the most out of your (cheap) hardware is always a challenge. Selling hardware is easier then supporting hardware.

The Raspberry Pi 4 has strong multimedia capabilities, it can playing 4K media 60fps, but getting it done isn’t a piece of cake. Even playing 1080HD content on YouTube can be a problem, but that’s probably because YouTube is more about tracking and selling adds than playing media.

A bold statement? Think about it this way. Any 1080p movie will play fine outside a browser in Kodi, any movie will play fine without DRM (Digital Rights Management). It chokes on the DRM en-/decryption. By definition: DRM is tracking.

Historically LibreElec is the best distribution for a Raspberry Pi as a multimedia device. LibreElec’s goal: just enough OS to support Kodi, and it is highly optimized for that.

Yes it’s powerful. You can install add-ons like MPD for music, or RetroPie-alike  for games. Also docker containers are available for HomeAssistant, MQTT and Nginx. So a RPI with LibreElec can be pretty powerful.

Still LibreElec is limited, and the RPI4 is capable of doing more.

Kodi on Raspberry used to work pretty well, until big changes in the 5.10 kernel came. It more or less stopped working on Buster. Compiling it yourself was quite a hassle, that actually failed more than it succeeded. I wrote about that before and it failed in most cases for most users including myself, I must admit.

But now luckily RPI-engineers stepped up:  Kodi in Rapsberry Pi OS is more or less supported again.

At least it’s easy again to install Kodi in Bullseye. But you still need a bit more tweaks to get it running smoothly.

To install Kodi in Bullseye

No OS can beat this 🙂 :

sudo apt install kodi

Install addons

Two important add-ons that can’t be installed from within Kodi like in LibreElec, but you have to resort to apt again:

TVHeadend-client (DVB-T tv)

sudo apt install kodi-pvr-hts

Only the client is installed with this command, this assumes a TV-Headend server is running on another local IP-address.

Inputstream-adaptive helper to play DRM protected (Widevine) content

sudo apt-get install kodi-inputstream-adaptive

The add-on then will extract (and update) the needed libs from internet automatically.

To enable HEVC HW decoding, you have to tweak /boot/config.txt

Add this line (only for RPI4)

dtoverlay=rpivid-v4l2

For 4K HEVC playback tweak this line:

# Enable DRM VC4 V3D driver
dtoverlay=vc4-kms-v3d,cma-512

Mount NFS shares

Somehow Kodi on Bullseye stopped discovering NFS by default. Don’t worry to much, just give it a little manual bump.

  • Choose Browse for new share -> Add network location -> Protocol -> Network File System (NFS)
  • Entering the your ip-address as Server address and Remote path manually, adding up to something like nfs://192.168.0.3:/path/to/mnt/
  • Click OK, then it will list.
  • Select and click OK.

Conclusion

Changes in `/boot/config.txt` require a reboot.

After all these steps, playing 4K HEVC content with HW-acceleration should work fine on a Raspberry Pi 4.

That’s all. Let me know if it’s working for you.


No Comments

Powering a Pi Zero (2) from your laptop

Friday, November 12th, 2021

The new quad-core Pi Zero 2 has a lot more horsepower than the original Zero and as a consequence it does require more power than the original Zero.

But that doesn’t necessarily means that you cannot power it from an USB port from your laptop.

Can you still power a Raspberry Pi Zero from an USB port of a laptop?

Let’s try. Be reminded all Pi’s are cleverly designed to throttle down, when they experience a power shortage.

To check if your Pi has throttled down:

> vcgencmd get_throttled
throttled=0x0

If you see some other output then 0x0 yes then you’ve had power problems. Otherwise you’re OK.

For the moment, running Raspberry Pi OS Bullseye on a Raspberry Pi Zero 2 powered form an USB port doesn’t show problems by just installing programs and updating the OS.

No Comments

No display after update to LibreElec 10.0.1 on a Raspberry Pi 4

Tuesday, November 9th, 2021

Last weekend I did an upgrade on my Kodi/LibreElec 10.0.0 RPI4 to 10.0.1.

All went well initially, I also did a firmware upgrade, but after rebooting I got a blank screen.

For a moment I thought Kodi didn’t boot at all, but on my Kore remote app, I saw that it was connected.

Also I could hear the GUI sounds. I disconnected my monitor, tried different HDMI inputs and different settings on the monitor. To no avail. Rebooted my Pi again. Shut it down, disconnected the power, connected it again, and rebooted. Still a blank screen. Could see the blown up pixel for a while, but blank screen afterward.

Still I could hear the GUI sounds, and I could even start a DVB-T TV channel.

So Kodi was working, but there was no HDMI output! Then intuitively I changed the audio-output from IQAudioDAC to HDMI and suddenly it started working! I changed it again to IQAudioDAC and screen output kept working.

And it did since!

Somehow changing the audio output fixed the blank screen output on my Raspberry Pi 4. Weird.

And don’t ask me why, but I’m still happy with this LibreElec / Kodi setup on my Raspberry Pi 4.

Changing Audio output remotely on Kodi

To change the audio output for Kodi remotely, instead of using the GUI or the Kore remote app and a lot of clicks, you can use these commands from another PC or phone:

Change to HDMI

curl -v -H "Content-type: application/json" -d '{"jsonrpc":"2.0","method":"Settings.SetSettingValue", "params":{"setting":"audiooutput.audiodevice","value":"PI:HDMI"},"id":1}' http://yourpi.local:8080/jsonrpc

Change to analogue

curl -v -H "Content-type: application/json" -d '{"jsonrpc":"2.0","method":"Settings.SetSettingValue", "params":{"setting":"audiooutput.audiodevice","value":"PI:Analogue"},"id":1}' http://yourpi.local:8080/jsonrpc


Remember to change the domain/hostname ot an IP-address if you wish to run the command from your Android phone.

Above commands work great as Termux Widget shortcuts on your Android Phone.

3 Comments

Playing 4K smoothly on the Pi4, compiling Kodi 19 on Raspberry Pi OS

Thursday, June 24th, 2021

Kodi is the best software to watch video on a Raspberry Pi. The Raspberry Pi 4 supports 4K, but the only software that can play it well is Kodi. That’s a bit disappointing, knowing the the Pi4 is already available since early 2019.

On the other hand, Kodi is nice open source software, with a thriving community.

Playing video in a browser is energy-wise, (privacy-wise IMHO) and performance-wise a bad thing. Try playing YouTube movies in a browser and in Kodi (unofficial YouTube plugin), and see the differences. Stuttering play, and high CPU usage in the browser, smooth play and lower CPU usage in Kodi.

The best performance for Kodi is offered by LibreELEC, a lightweight ‘Just enough OS’ Linux distribution. if you wanna run the latest Kodi on Raspberry Pi OS, you’ll need to compile it yourself at the moment.

Compile instructions Kodi 19

There isn’t yet an updated version Kodi 19 in Raspberry Pi OS, so you’ll need to compile Kodi 19 yourself. Big underlying changes in the way video and hardware-accceleration is done in the new kernel 5.10 broke Kodi 18.7 and

On the Kodi forum there are several attempts to compile a working version, but apparently that is not so simple. Still I used those instructions as a base, but added the kernel-header packages ` as a dependency and use a patched version of Kodi.

# sudo apt update && sudo apt full-upgrade -y


sudo apt install                                                     \
autoconf automake autopoint autotools-dev cmake cpp curl default-jre \
g++ gawk gcc gdc gettext git gperf libasound2-dev libass-dev             \
libavahi-client-dev libavahi-common-dev libbluetooth-dev             \
libbluray-dev libbz2-dev libcdio-dev libcec4 libcec-dev              \
libcrossguid-dev libcurl4-openssl-dev libcwiid-dev libdbus-1-dev     \
libdrm-dev libegl1-mesa-dev libenca-dev libflac-dev libfmt3-dev      \
libfontconfig-dev libfreetype6-dev libfribidi-dev libfstrcmp-dev     \
libgbm-dev libgcrypt-dev libgif-dev libgles2-mesa-dev libglew-dev    \
libglu1-mesa-dev libgnutls28-dev libgpg-error-dev libgtest-dev       \
libinput-dev libiso9660-dev libjpeg-dev liblcms2-dev liblirc-dev     \
libltdl-dev liblzo2-dev libmariadb-dev libmicrohttpd-dev libnfs-dev  \
libogg-dev libomxil-bellagio-dev libpcre3-dev libplist-dev           \
libpng-dev libpulse-dev libshairplay-dev libsmbclient-dev            \
libsqlite3-dev libssl-dev libtag1-dev libtiff5-dev libtinyxml-dev    \
libtool libudev-dev libunistring-dev libva-dev libvdpau-dev          \
libvorbis-dev libxkbcommon-dev libxmu-dev libxrandr-dev libxslt1-dev \
libxt-dev lsb-release meson nasm ninja-build python3-dev python3-pil \
python-support rapidjson-dev raspberrypi-kernel-headers swig unzip \
uuid-dev wayland-protocols yasm zip zlib1g-dev

Then you need a special GBM version of Kodi, but instead of this version.

wget https://github.com/popcornmix/xbmc/archive/gbm_matrix.zip

I used a patched version:

wget https://github.com/graysky2/xbmc/archive/refs/heads/gs-gbm_matrix.zip

Then this workaround is needed, Raspberry Pi OS uses a different path for some files. This just creates a symbolic link to the right path.


# drm_fourcc error workaround
sudo mkdir /usr/include/drm/ 
sudo ln -s /usr/include/libdrm/drm_fourcc.h /usr/include/drm/drm_fourcc.h

Extract the downloaded zip:

unzip gs-gbm_matrix.zip

Enter the map

cd xbmc-gs-gbm_matrix

Create build directory:

mkdir kodi-build

Enter build directory

cd kodi-build

Then make:

cmake .. -DCMAKE_INSTALL_PREFIX=/usr/local -DCORE_PLATFORM_NAME=gbm -DAPP_RENDER_SYSTEM=gles -DX11_RENDER_SYSTEM=gles -DENABLE_INTERNAL_FMT=ON -DENABLE_INTERNAL_FLATBUFFERS=ON -DENABLE_INTERNAL_SPDLOG=ON -DENABLE_VAAPI=OFF -DENABLE_VDPAU=OFF

Then compile

cmake --build . -- VERBOSE=1 -j$(getconf _NPROCESSORS_ONLN)

If done properly, ti should take about 2 hours. Afterwards you can start Kodi with `kodi-build/kodi-gbm`

That’s all. And don’t forget to backup your existing Kodi profile.

Occasionally the script exits with an error. Seems it’s running out of memory. Just restart the building process, executing the cmake –build command, to finish compiling.

UPDATE:

For Raspberry Pi Bullseye see this new post:

No Comments

Debugging Audio problems on a Raspberry Pi

Sunday, February 21st, 2021

A Raspberry Pi is a great small computer that can run 24 hours with no problem, and just consumes a few watts, so it’s a fine candidate for a modern flexible media player.

The default high quality sound output of a Raspberry Pi is HDMI, which is great for video, but not so great for classic stereo systems. The standard analogue out is near CD quality. Fine for system sounds and video calling, but not enough for HiFi. Remember the Pi is designed as a cheap computer for educational purposes.

HiFi audiophiles probably want to add a dedicated USB-DAC (you lose an USB port) or dedicated HAT like HiFiBerry or IQAudio.

ALSA and PulseAudio soundserver

Then we have the software thing. Raspbian always used Advanced Linux Sound Architecture (ALSA) as the driver and skipped the layer of PulseAudio, which is the default sound server that lays on top of ALSA in modern Debian and Ubuntu desktops.

Since the Pi400 was introduced, and marketed as a serious affordable desktop, the now renamed Raspberry Pi OS, started to offer PulseAudio as well in December 2020. The big win of PulseAudio, better support for Bluetooth and more programs can output sound at the same time. With ALSA output would be locked  by one program: you can’t mix.

Well with a caveat. Raspberry Pi OS with desktop is shipped with PulseAudio, but Raspberry Pi OS Lite is not shipped with PulseAudio, because shipping it with PulseAudio would make it a Raspberry Pi OS Medium. ;(

So Raspberry Pi OS Lite uses just ALSA, Raspberry Pi OS with desktop uses also ALSA, but on top of that the PulseAudio layer.

Debug audio on a Raspberry Pi

Check the hardware, it doesn’t matter in this step if you use PulseAudio or not.

Start with listing all audio outputs:

aplay -l

This should output something like:

**** List of PLAYBACK Hardware Devices ****
card 0: b1 [bcm2835 HDMI 1], device 0: bcm2835 HDMI 1 [bcm2835 HDMI 1]
Subdevices: 4/4
Subdevice #0: subdevice #0
Subdevice #1: subdevice #1
Subdevice #2: subdevice #2
Subdevice #3: subdevice #3
card 1: Headphones [bcm2835 Headphones], device 0: bcm2835 Headphones [bcm2835 Headphones]
Subdevices: 4/4
Subdevice #0: subdevice #0
Subdevice #1: subdevice #1
Subdevice #2: subdevice #2
Subdevice #3: subdevice #3
card 2: IQaudIODAC [IQaudIODAC], device 0: IQaudIO DAC HiFi pcm512x-hifi-0 [IQaudIO DAC HiFi pcm512x-hifi-0]
Subdevices: 1/1
Subdevice #0: subdevice #0
card 3: DAC [USB AUDIO DAC], device 0: USB Audio [USB Audio]
Subdevices: 1/1
Subdevice #0: subdevice #0

Here you see the four outputs: HDMI output (0), analogue out (1),  IQAudio HAT  (2), and an USB-DAC (3)

To test your hardware, upload a test.wav file to your Pi (aplay can’t play mp3 files), and try the different outputs.

aplay -D plughw:0 test.wav # HDMI
aplay -D plughw:1 test.wav #headphones/audio out
aplay -D plughw:2 test.wav # iqaudio
aplay -D plughw:3 test.wav # USB DAC

Of course you need to have the outputs properly connected to an amplifier, monitor or headphone. Now you know your hardware is working OK.

Check for a faulty power supply

If you have hisses, or distortion, also always check your Raspberry Pi for throttling and a possible power or heating problem:

vcgencmd get_throttled
throttled=0x0

If you see a different output, that suggests you have a faulty power supply. Phone chargers typically are not stable PSU’s. Better use the official Raspberry Pi power supply. Also the quality of the cable really does matter.

If that is also OK, it’s just about configuring the right output in your software.

Configuring the Music Player Daemon

To set the IQAudio HAT as the default ALSA output in /etc/mpd.conf

audio_output {
type "alsa"
name "IQAudio"
device "hw:2" # set hw:3 for DAC out
}

To set PulseAudio as the default output:

audio_output { type "pulse" 
name "pulse audio" 
}

Do not edit boot/config.txt by default

In general there is no need to edit /boot/config.txt. Official HATS will configure automatically and the same goes for USB-DACS. Plug and play. You see older tutorials or manuals instructing you to edit /boot/config.txt for configuration. IMHO that is only needed in special cases. If you don’t know what you’re doing, don’t edit boot/config.txt.

No Comments

Stop your Raspberry Pi from leaking telemetry to Microsoft

Friday, February 19th, 2021

Visual Studio Code is a highly rewarded and much used code-editor from Microsoft.

Microsoft tells you it’s open source, but when you actually install it on your Raspberry Pi 4 or Raspberry Pi 400 as promoted, it suddenly isn’t open source anymore. The installation binaries come packed with some proprietary stuff, like telemetry and tracking.

There is no real reason for that, Microsoft could absolutely disable telemetry by default and offer it 100% open source, but Microsoft doesn’t do that. The company wants to ride on the popular waves of open source without actually practicing it.

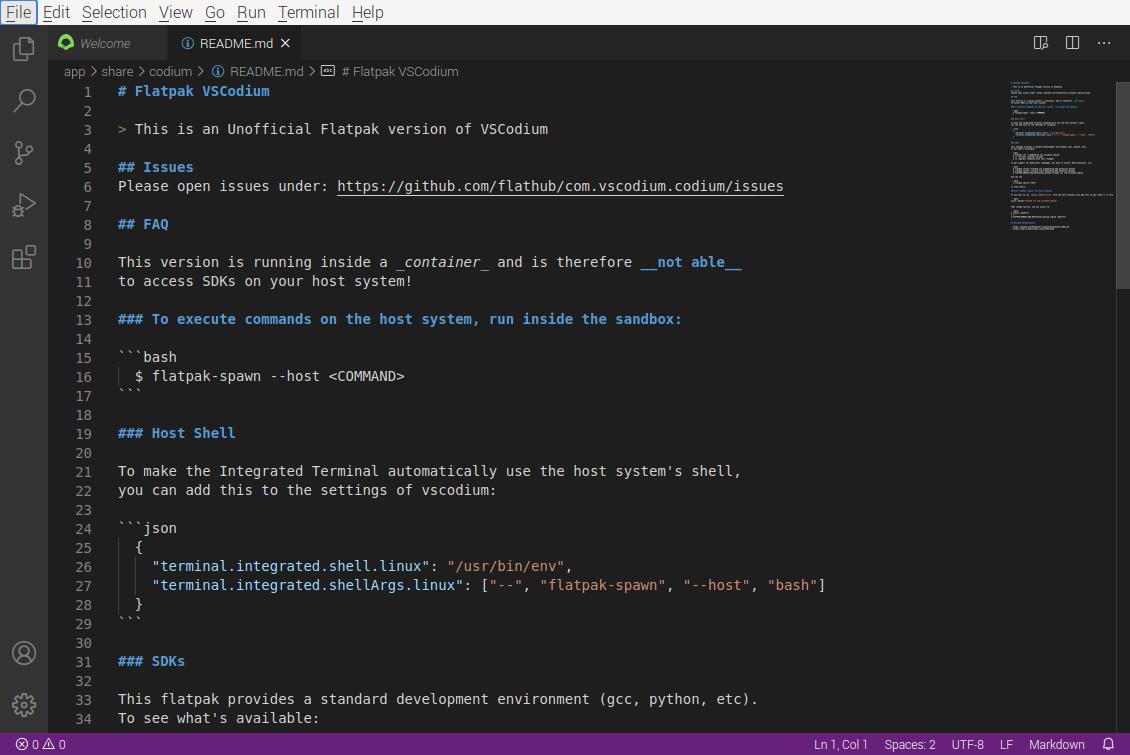
Luckily there is a real open source version of VSCode and that is called VSCodium:
https://github.com/VSCodium/vscodium

Somehow Microsoft has managed to get the Raspberry Pi Foundation to add a Microsoft repository with the non-open source version of VSCode.

So when you even do not want to use a Microsoft product, Microsoft is still getting some info about your usage of your Raspberry Pi. In every update your Pi will check with the servers if there is a update.

If you want to stop the spying and tracking, execute this command on your Raspberry Pi:

sudo sed -i 's/^deb/#deb/g' /etc/apt/sources.list.d/vscode.list

Or when you wanna do that remotely:

ssh yourpi "sudo sed -i 's/^deb/#deb/g' /etc/apt/sources.list.d/vscode.list"

This will comment-out the Microsoft repository, and stop checking / leaking usage data to Microsoft.

To install the real VSCode open source version on your Raspberry Pi 4(00):

Install from repository for Debian/Ubuntu/Linux Mint

Recommended way of install. It will update automatically, and now the Gitlab servers will be pinged and not Microsoft’s. 😉

That’s not much of a gain, but you get a version without telemetry and tracking and without proprietary code, and that is of course a real win.

See:

https://github.com/VSCodium/vscodium#install-with-package-manager

Install as Flatpak

Not the best choice, but you can install it aside a repository version; to check and test the speed and functionality of Flatpak builds.

Chances are high, you get a slightly older build this way.

flatpak install flathub com.vscodium.codium

flatpak run com.vscodium.codium
The 100% open source VSCodium running on a Pi 400

The 100% open source VSCodium running on a Pi 400


The main ten million dollar question remains, why doesn’t Microsoft offer a 100% open source version of VSCode in the first place?

It’s like wrapping a nice sustainable vegetable up in non-degradable plastic. We won’t save the planet with that attitude.