Archive for the ‘raspberrypi’ Category

3 Comments

Using A Raspberry Pi Zero as a webcam without SD card

Thursday, January 7th, 2021

The covid lock-down is sentencing a lot of people to work from home. For that we need webcams, a new pc, better monitorΒ  and other equipment. The Raspberry Pi 400 isΒ  a great and affordable second desktop, it’s the fastest Pi available suited for desktop use. It lacks a camera connector, so you need a Zero to connect a camera board.

So what about reusing that old gadget that was collecting dust in the drawer: a small and cheap Raspberry Pi Zero. If you also happen to own a camera board for that little computer, here is a nice project showmewebcam to turn that cheap computer into a handy webcam. It uses a small Buildroot Linux version and boots really fast.

And now that project has been forked on Github: showmewebcam-usbboot. No SD-card needed. That project will let the Raspberry Pi Zero boot over USB!

If you don’t have a camera board. You can buy a clone version of the v1 board for a few dollars in China, or get a v2 board or for the best results the really great HQ-camera board.

Interested in photography, that High Quality camera board can do some really great macro-photography.

Cheap Raspberry Pi webcam

With the Raspberry Pi Zero costing about 5 euro, and a clone camera board around 3 euro on AliExpress, you can have a very nice and decent webcam for less then 10 euro’s. And that is a bargain. Remember you don’t need an SD card. So save on the hardware where you can.

How does it work?

How does the Pi boot then? Over USB, so you do need the usbboot/rpiboot tool. That is free and opensource software made by the Raspberry Pi organization, a program that makes the Raspberry P Zero boot by pushing the operating system over USB.

Let’s try it out. I’m using an Ubuntu desktop.

Step 1: download showmewebcam-usbboot

Download the latest release .

Unzip it. You will extract a directory called showmewebcam-usbboot.

Step 2: install usbboot/rpiboot

If you have already installed a version of this tool, you can of course skip this tool and jump to step 3.

Download the usbboot/rpiboot, unzip it and build it according to the instructions.

Step 3: Connect the raspberry Pi Zero

(with installed camera board) by putting the USB plug into the middle USB connector.

Step 4: boot the webcam

You can start the webcam by executing the rpiboot tool and pointing it to the unzipped showmewebcam-usbboot directory

sudo ~/usbboot/rpiboot -d ~/showmewebcam-usbboot

After about half a minute booting the Raspberry Pi Webcam will be ready.

How to use the Webcam on the PC

For a quick start, and when no other cam is connected, you can start the webcam with (Ubuntu):

mpv /dev/video0

On a laptop with a build-in webcam the command that you have to issue will be :

mpv /dev/video2

To control your cams on the PC, you need `v4l-utils` (apt install v4l-utils)

To set the resolution

v4l2-ctl --set-fmt-video=width=1280,height=720 -d /dev/video2

To list all video devices:

v4l2-ctl --list-devices

To list the specs of your video devices:

v4l2-ctl --list-formats-ext
ffmpeg -f v4l2 -list_formats all -i /dev/video2

A serial connection will also be available, so you can connect to the Webcam to control the settings and do debugging. That works exactly the same as in showmewebcam

Control the webcam

Finer control offers the camera-ctl tool on the Zero

Connect to the Zero:

sudo screen /dev/ttyACM0 115200 Start the tool # /usr/bin/camera-ctl
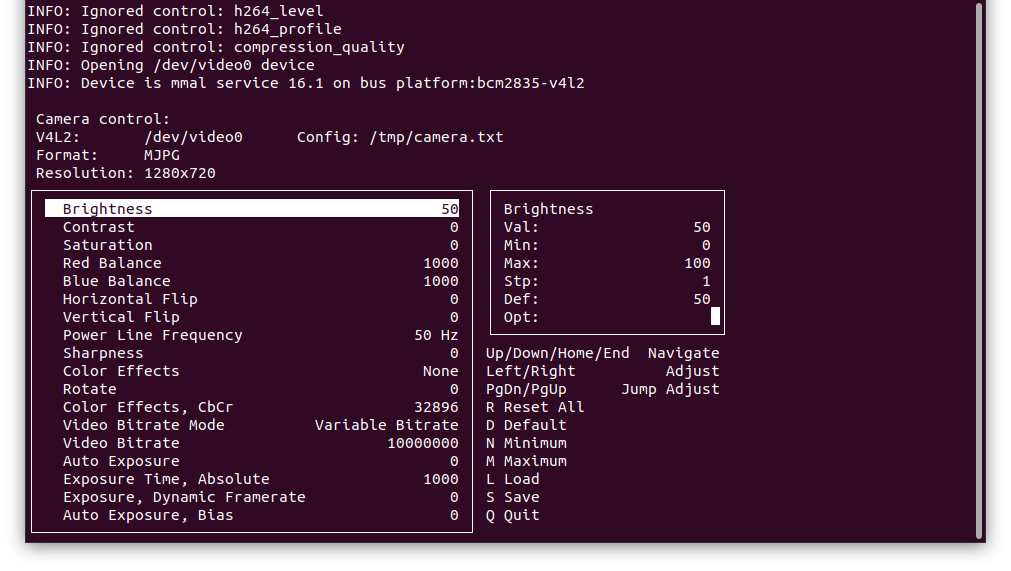
Showmewebcam-usbboot - Controlling the webcam with camera-ctl

Controlling the webcam with camera-ctl

Create a stereo webcam

The tool will let you boot more then one Raspberry Pi Zero from the same directory. Just connect the two Raspberry Pi Webcams and start the tool. One will boot, just execute the tool another time and the other one will boot.

The webcams will be available as /dev/video0 (you) and /dev/video2 (your cat) on your Pi400.

Now make that video call with your boss, and ask for a raise. Switch the webcam to your cat the moment you stopped speaking.

What can showmewebcam-usbboot do what showmewebcam can’t do?

Nothing. It can do the same with less hardware, because it doesn’t need an SD card. But is does need extra software, which can limit compatibility. It also boots slower.

It hasn’t been tested that much.

Have fun, try it out,Β  en let me now your thoughts!

Links:

No Comments

Fixing HifiBerry and Raspberry Pi sound after update

Friday, June 19th, 2020

I updated my Raspberry Pi 4 which I use for playing music with the great, free and open source MPD server.

After reboot it stopped playing music. ;(

The cause was this update in May/June 2020, due to a change in audio configuration. MPD was still working but the sound was now not routed through the HifiBerry soundcard, but through the audio/headphones, simply because a new HW card was defined: headphones/analog audio out.

The solution was easy.

aplay -l shows the Hifiberry the third card instead of the second, the new headphones was now the second.

 $ aplay -l
**** List of PLAYBACK Hardware Devices **** 
card 0: b1 [bcm2835 HDMI 1], device 0: bcm2835 HDMI 1 [bcm2835 HDMI 1] 
Subdevices: 4/4 
Subdevice #0: subdevice #0 
Subdevice #1: subdevice #1 
Subdevice #2: subdevice #2 
Subdevice #3: subdevice #3 
card 1: Headphones [bcm2835 Headphones], device 0: bcm2835 Headphones [bcm2835 Headphones] 
Subdevices: 4/4 
Subdevice #0: subdevice #0 
Subdevice #1: subdevice #1 
Subdevice #2: subdevice #2 
Subdevice #3: subdevice #3 
card 2: sndrpihifiberry [snd_rpi_hifiberry_dac], device 0: HifiBerry DAC HiFi pcm5102a-hifi-0 [HifiBerry DAC HiFi pcm5102a-hifi-0]
Subdevices: 0/1 
Subdevice #0: subdevice #0

All I had to do is to edit /etc/asound.conf and increase 1 to 2:

pcm.!default {
type hw card 2
}
ctl.!default {
type hw card 2
}

Restart MPD and everything was working like before. πŸ˜‰

sudo systemctl restart mpd


No Comments

Filter thread sizes Raspberry Pi 6mm and 16mm lenses

Sunday, June 7th, 2020

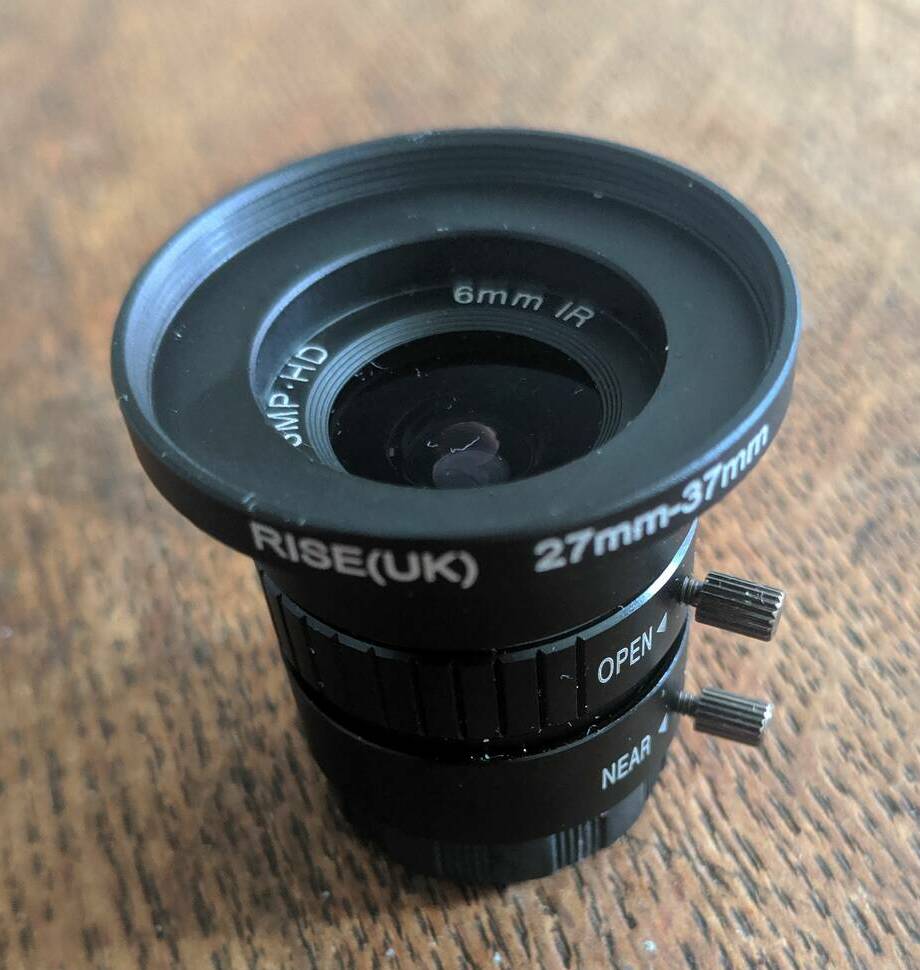
The filter thread size for the Raspberry Pi 6mm CS mount lens is 27mm.

Raspberry Pi 6mm lens with step-up-ring

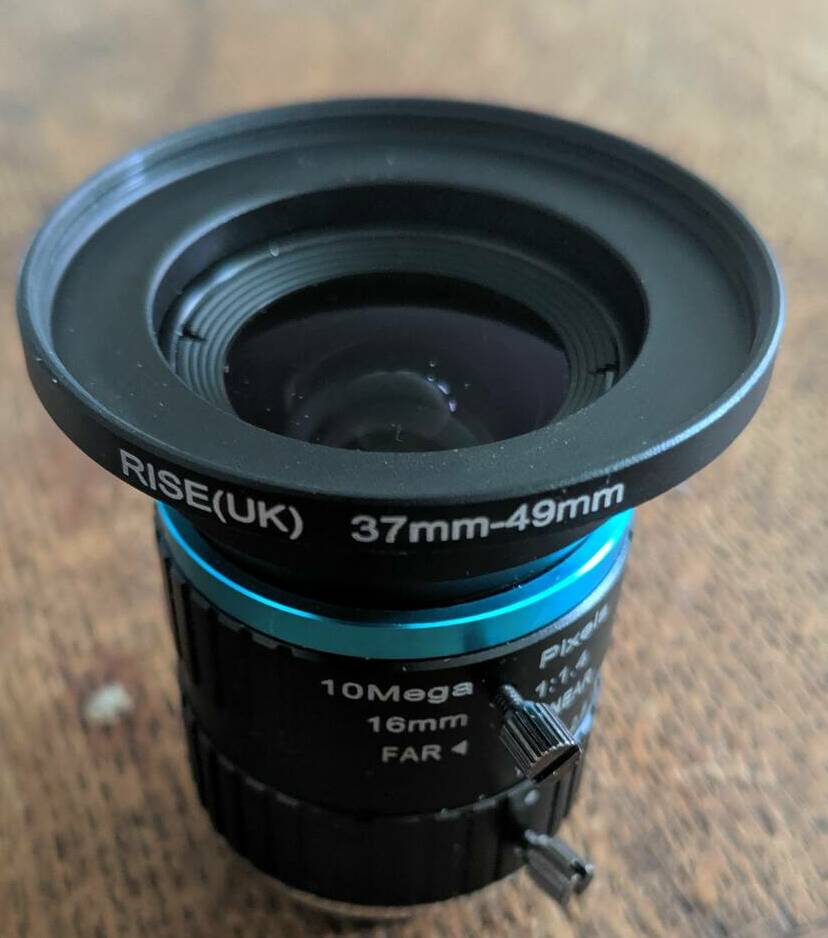
The filter thread size for the Raspberry Pi 16mm C mount lens is 37mm.

Raspberry Pi 16mm lens with step-up-ring

You can useΒ  these lenses as macro lens by to reverse mounting them on the Raspberry Pi HQ camera.Β  That works surprisingly good. See my earlier posts.

In short: you need a reverse macro ring adapter and some step up rings. I use a Pentax K-mount adapter and ring, because I have some classic Pentax glass, that can be also used with the Raspberry Pi HQ camera.


3 Comments

Macro Photography with the Raspberry Pi HQ camera and reversing the lens

Wednesday, June 3rd, 2020

The Raspberry Pi is a small computer, but it is a great machine for experimenting with all sorts of technology. The Raspberry Pi Foundation just introduced a new High Quality camera with changeable lenses, so let’s find out if that new camera board can be used for photographing small objects.

FruitflyRaspberry Pi HQ Camera

Fruitfly

And I’m gone a use a rather surprising but cheap technique: reversing the lens.

(more…)

No Comments

Ubuntu 20.04 is running great (again) on older hardware

Wednesday, May 20th, 2020

When Ubuntu made the move from Unity to Gnome3, with 18.04, my old su4100 laptop from 2010, did not run the new Gnome3 really well. So I tried out Mate, and in the end Kubuntu.

I was surprised that KDE was much smoother experience than Gnome3 on 18.04. At that moment.

Things improved with Gnome3 with 19.10, but now with 20.04 Ubuntu is running nice again on lower spec hardware.

Still a SSD is much needed, but my old su4100 2 core processor, is delivering a nice and smooth feeling with a fresh Ubuntu 20.04 install.

Great.

That’s why I like Linux. Free, open source, and more sustainable than Apple OS or Microsoft Windows.


No Comments

Upgrade deepspeech 0.7 on a Raspberry Pi 4

Saturday, April 25th, 2020

In an earlier post I described how to install deepspeech on a Raspberry Pi 4. That wasn’t exactly a really smooth install, but I managed in the end.

Upgrading to deepspeech 0.7 is much easier:

Activate the virtual environment:

source dev/deepspeech-train-venv/bin/activate

Upgrade deepspeech

pip install --upgrade deepspeech 
Looking in indexes: https://pypi.org/simple, https://www.piwheels.org/simple
Collecting deepspeech
Downloading https://files.pythonhosted.org/packages/fc/e6/3bee97bf20761b9930d46638f4b8d96b3fcb84e1843d59e25c4b19f88acc/deepspeech-0.7.0-cp37-cp37m-linux_armv7l.whl (1.4MB)
100% |β–ˆβ–ˆβ–ˆβ–ˆβ–ˆβ–ˆβ–ˆβ–ˆβ–ˆβ–ˆβ–ˆβ–ˆβ–ˆβ–ˆβ–ˆβ–ˆβ–ˆβ–ˆβ–ˆβ–ˆβ–ˆβ–ˆβ–ˆβ–ˆβ–ˆβ–ˆβ–ˆβ–ˆβ–ˆβ–ˆβ–ˆβ–ˆ| 1.4MB 258kB/s 
Requirement already satisfied, skipping upgrade: numpy>=1.14.5 in ./dev/deepspeech-train-venv/lib/python3.7/site-packages (from deepspeech) (1.18.0)
Installing collected packages: deepspeech
Found existing installation: deepspeech 0.6.0
Uninstalling deepspeech-0.6.0:
Successfully uninstalled deepspeech-0.6.0
Successfully installed deepspeech-0.7.0